Sorghum is a versatile and resilient crop known for its adaptability to various climates and soil types. Whether you’re cultivating sorghum for grain, forage, or syrup, understanding the optimal planting time is crucial for maximizing yield and quality. This guide will explore the initial steps in planting sorghum, focusing on its varieties, climate considerations, and determining the best planting time.
Introduction to Sorghum
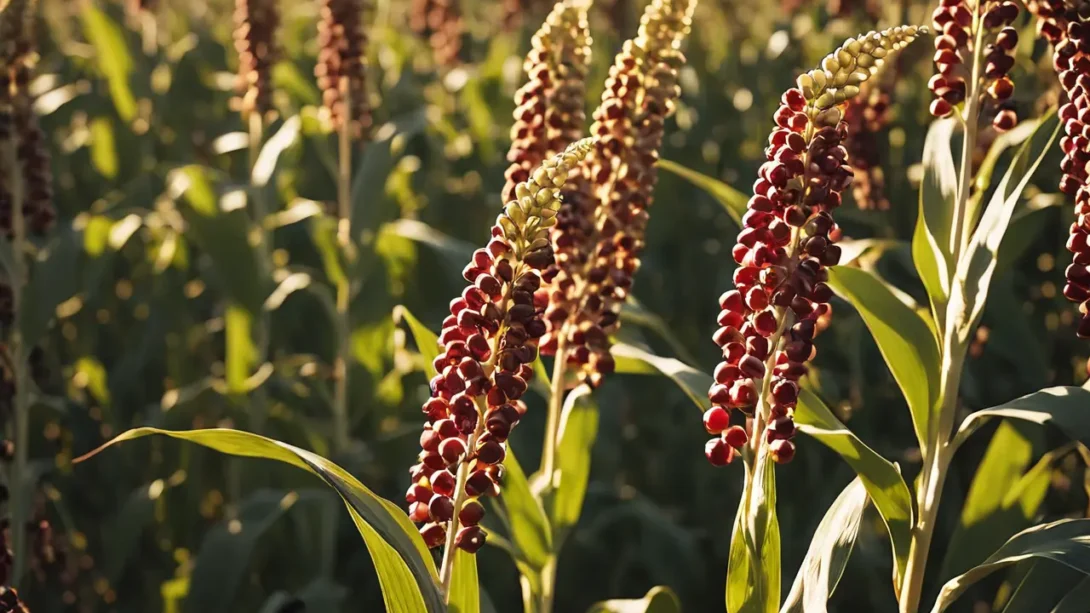
Sorghum (Sorghum bicolor), a cereal grain, plays a pivotal role in global agriculture. It’s prized for its drought tolerance and versatility, serving as a staple food, animal feed, and biofuel source. The timing of sorghum planting is vital, as it influences the plant’s growth cycle, pest management, and harvest quality. By understanding the nuances of sorghum cultivation, farmers and gardeners can ensure a successful crop.
Sorghum Varieties
Sorghum comes in several varieties, each suited to different uses and climates:
- Grain Sorghum: Primarily used for human consumption and animal feed, grain sorghum varieties are known for their nutrient-rich seeds.
- Forage Sorghum: Grown for its leaves and stalks, forage sorghum is a vital animal feed source, especially in arid regions.
- Sweet Sorghum: Cultivated for its stalks, which are processed to produce sorghum syrup, a sweetener.
Selecting the right sorghum variety is the first step in achieving a successful crop. Consider your climate, soil type, and intended use of the sorghum when choosing a variety.
Climate Considerations for Sorghum
Sorghum thrives in warm environments and is known for its heat and drought tolerance. The ideal climate for sorghum cultivation features:
- Temperature: Sorghum seeds require a soil temperature of at least 65°F (18°C) for germination, with optimal growth occurring in air temperatures ranging from 70°F to 90°F (21°C to 32°C).
- Rainfall: While sorghum can withstand drought conditions, it performs best with 15 to 25 inches (380 to 635 mm) of rainfall during the growing season.
Understanding the climate conditions in your area is crucial for determining the best planting time for sorghum.
Determining the Best Planting Time
The optimal planting time for sorghum varies by region, largely depending on soil temperature and the last expected frost date:
- General Guidelines: In most regions, sorghum should be planted after the danger of frost has passed and when soil temperatures consistently reach 65°F (18°C) or higher.
- By Region:
- In southern areas with warmer climates, sorghum planting can begin as early as late April to early May.
- In northern regions, planting may need to wait until late May or early June to ensure suitable soil temperatures.
Monitoring soil temperature and regional climate trends is essential for choosing the right planting window. Planting too early can risk frost damage, while late planting may reduce the growing season, impacting yield and quality.
Preparing the Soil for Sorghum
For sorghum to thrive, it requires well-prepared soil that can support its growth throughout the season. The right soil preparation not only enhances the soil structure and fertility but also ensures the seeds have the best environment for germination and development.
Soil Requirements for Optimal Sorghum Growth
Sorghum prefers well-drained soils with a neutral pH, typically between 6.0 and 7.5. The crop can tolerate a range of soil types, from sandy loams to clay loams, showcasing its adaptability. However, ensuring the soil is rich in organic matter can significantly boost sorghum’s performance by improving soil structure, moisture retention, and nutrient availability.
Pre-planting Soil Preparation Techniques
- Testing Soil: Begin with a soil test to determine pH and nutrient levels. This will guide any necessary amendments to optimize the soil for sorghum planting.
- Amending Soil: Based on the soil test results, incorporate organic matter, such as compost or aged manure, to improve fertility and structure. Adjust pH if necessary, using lime to raise pH or sulfur to lower it.
- Tillage: Perform shallow tillage to break up compacted soil layers, which enhances root penetration and water infiltration. However, minimize disturbance to protect soil structure and moisture levels.
- Weed Control: Clear the planting area of weeds and debris to reduce competition and prevent pests and diseases. A clean start is crucial for young sorghum plants to establish well.
Planting Sorghum
With the soil prepared, planting sorghum correctly is the next step to ensure your crop gets off to the best start possible.
Step-by-Step Guide to Planting Sorghum Seeds
- Sowing Depth: Plant sorghum seeds about 1 to 1.5 inches deep, ensuring they have adequate soil contact for moisture absorption and germination.
- Row Spacing: Space rows 20 to 30 inches apart, depending on the sorghum variety and the machinery used for planting and harvesting. Proper spacing is essential for air circulation and sunlight penetration, reducing the risk of disease.
- Seed Spacing: In the row, aim for a seed spacing of 2 to 3 inches. This may require thinning after germination to achieve the optimal plant density, which depends on the variety and your yield goals.
Spacing and Depth Considerations for Different Sorghum Types
- Grain Sorghum: Typically requires closer spacing to maximize grain production per acre.
- Forage and Sweet Sorghum: These types may benefit from wider spacing, allowing for larger plant growth, which is ideal for biomass production.
Post-Planting Care
After planting, providing the right care for your sorghum is crucial for its development and eventual yield.
Watering Requirements for Sorghum
Sorghum’s drought tolerance doesn’t mean it thrives without water. Initial watering after planting helps with germination, and consistent moisture is crucial during early growth stages. However, once established, sorghum can withstand dry conditions better than many crops.
Fertilization and Weed Control Strategies
- Fertilization: Apply a balanced fertilizer at planting, based on soil test recommendations. Sorghum’s nutrient needs are lower than some crops, but nitrogen, phosphorus, and potassium are still essential for healthy growth.
- Weed Control: Implement a weed management plan early on. Use pre-emergent herbicides if appropriate and consider mechanical cultivation to control weeds without harming the sorghum seedlings.
Monitoring Sorghum Growth
Observing your sorghum crop throughout its growth stages is vital for timely interventions, ensuring healthy development, and maximizing yield. Sorghum progresses through several key stages from germination to maturity, and each stage has specific needs and potential challenges.
Key Growth Stages of Sorghum
- Germination and Seedling: Early growth requires consistent moisture. Protect seedlings from pests and diseases.
- Vegetative: As plants grow, monitor nutrient levels and water availability. Sorghum can tolerate dry conditions, but adequate water during this stage supports healthy leaf development.
- Flowering and Grain Filling: This critical stage determines the yield and quality of your sorghum crop. Ensure plants have sufficient nutrients and water to support grain development.
Signs of Healthy Sorghum Development
- Vigorous Growth: Strong, upright stalks and healthy green leaves are indicators of good health.
- Timely Flowering: Flowering that occurs according to the expected growth schedule for your variety suggests that plants are developing well.
- Grain Formation: Well-formed grains filling the panicle evenly are a sign of successful pollination and nutrient availability.
Harvesting Sorghum
Knowing when and how to harvest sorghum is as crucial as knowing when to plant it. The timing of the harvest can significantly impact the quality and usability of the sorghum, whether for grain, forage, or syrup.
When and How to Harvest Sorghum
- Grain Sorghum: Harvest when the grains are mature and have a moisture content of about 20-25%. This typically occurs 100-120 days after planting, depending on the variety and growing conditions. Use a combine for harvesting and adjust the settings to minimize grain damage.
- Forage Sorghum: Cut forage sorghum when it reaches the soft dough stage for the highest nutrient content. For silage, ensile it at the correct moisture level to prevent spoilage.
- Sweet Sorghum: Harvest sweet sorghum when the stalks are fully mature and the sugars are concentrated. Test a stalk for sweetness to determine the right time.
Post-Harvest Processing and Storage Tips
- Drying: Grain sorghum needs to be dried to a moisture content of about 12% before storage to prevent mold and spoilage.
- Storage: Store dried grains in a cool, dry place. Forage sorghum should be stored in silos or bales under proper conditions to maintain its nutritional value.
- Syrup Processing: For sweet sorghum, process the stalks into syrup shortly after harvest to preserve the sugar content and flavor.
Harvesting at the right time and following proper post-harvest processing and storage techniques are essential to maximize the benefits of your sorghum crop. Whether you’re growing sorghum for grain, forage, or syrup, understanding these final stages ensures that your efforts from planting to harvest yield the best possible outcomes.
In conclusion, successful sorghum cultivation requires attention to detail from pre-planting preparation through to harvest and beyond. By selecting the right variety, planting at the optimal time, providing diligent care, and monitoring growth stages, you can achieve a bountiful sorghum harvest tailored to your needs.