Hosta plants are renowned for their lush foliage and adaptability, making them a beloved addition to many gardens. Whether you’re a seasoned gardener or a beginner, learning how to plant hosta bulbs can enhance the beauty of your outdoor space. In this comprehensive guide, we will walk you through the process step by step, starting with one of the most crucial aspects: choosing the right location for your hosta plants. By selecting the perfect spot, you’ll lay the foundation for thriving hostas that will grace your garden with their elegance.
- Exercise caution and use your best judgment before ordering during unusually hot or cold weather (below 32 degrees F, or in excess of 95F for shipping purposes), as these extremes may leave your plant vulnerable to damage. The optimal time for planting for most of our material is in mid to late spring, past the danger of hard frost. Please refer to our preferred shipping and planting guide for your area below.
Choosing the Right Location
Selecting the optimal location for planting hosta bulbs is essential to their long-term health and vibrancy. Here are key considerations to keep in mind:
- Light Requirements: Hostas thrive in different light conditions depending on the variety. While some prefer full shade, others can tolerate dappled sunlight or even partial to full sun. Assess the sunlight patterns in your garden to determine the ideal location for your chosen hosta variety.
- Soil Quality: Hostas thrive in well-draining soil rich in organic matter. Conduct a soil test to determine the pH level and nutrient content of your chosen planting area. Amend the soil as needed to create the ideal growing environment for hostas.
- Moisture Levels: Hostas require consistent moisture to flourish. Consider the moisture availability in the chosen location. Avoid areas prone to waterlogging or drought, as extreme conditions can stress hosta plants.
- Spacing: Plan for adequate spacing between hosta plants. This allows for healthy air circulation, reducing the risk of fungal diseases. Each hosta variety may have specific spacing requirements, so consult the plant’s label or guidelines.
- Proximity to Other Plants: Be mindful of neighboring plants. Avoid planting hostas near aggressive, fast-spreading species that might compete for resources or overshadow your hosta plants.
- Aesthetic Considerations: Think about the overall design and visual appeal of your garden. Hostas can be used as focal points, border plants, or ground cover, so choose a location that complements your garden’s layout.
- Accessibility: Consider the practicality of the chosen location. Ensure it’s easy to access for planting, watering, and maintenance.
- Protection from Wildlife: If wildlife, such as deer or rabbits, are common in your area and known to munch on hostas, consider protective measures like fencing or planting in areas less accessible to these animals.
By carefully assessing these factors, you can select an ideal location that caters to your hosta variety’s specific needs. Choosing the right spot sets the stage for healthy hosta growth and ensures you’ll enjoy their beauty for years to come.
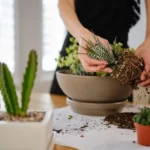
Gathering Your Materials
Before you begin planting hosta bulbs, it’s essential to gather the necessary materials and tools. Here’s what you’ll need:
- Hosta Bulbs: Purchase high-quality hosta bulbs from a reputable nursery or garden center. Choose varieties that suit your garden’s light conditions and size preferences.
- Gardening Gloves: Protect your hands with sturdy gardening gloves to prevent blisters and soil contact.
- Shovel: A good-quality shovel is essential for digging holes and preparing the planting site.
- Compost or Organic Matter: Have well-rotted compost or organic matter on hand to amend the soil and improve its fertility.
- Mulch: Prepare mulch, such as shredded leaves or wood chips, for later use around the newly planted hosta bulbs.
- Garden Hose or Watering Can: Ensure you have a water source nearby for watering the bulbs once they’re planted.
- Measuring Tape: Use a measuring tape or a gardening tool with built-in measurements to ensure proper spacing between hosta bulbs.
- Garden Markers: If planting multiple hosta varieties, consider using garden markers or labels to identify each one.
- Wheelbarrow or Garden Cart: Use a wheelbarrow or garden cart to transport materials, bulbs, and tools to the planting site efficiently.

- This bag has been repaired due to damages to packaging during warehouse handling. Derived from the shell of the cocoa bean, natural dark, fade resistant color and pleasing cocoa aroma
- Very lightweight and easy to spread and will not burn vegetation
- Speeds soil warm-up in the spring and protects perennial root structures
- PLEASE NOTE this product is unsafe for dogs and is not for human consumption
Preparing the Planting Site
Properly preparing the planting site is crucial for the success of your hosta bulbs. Follow these steps:
- Clear Debris: Remove any debris, weeds, rocks, or existing plants from the chosen area. Clear a clean, open space for planting.
- Soil Testing: Conduct a soil test to determine the pH level and nutrient content of your soil. Hostas prefer slightly acidic soil with good organic matter content. Amend the soil based on the test results to create an ideal growing environment.
- Loosen Soil: Use a shovel or garden fork to loosen the soil in the planting area to a depth of at least 12 inches. This improves drainage and root penetration.
- Amend with Organic Matter: Incorporate well-rotted compost or organic matter into the soil to enrich its fertility. Work it thoroughly into the planting site.
- Create Planting Holes: Dig planting holes for each hosta bulb. The depth should be about twice the height of the bulb. Ensure proper spacing between holes based on the specific hosta variety’s recommendations.
- Position Bulbs: Place each hosta bulb into its respective hole with the growing points facing upward. Adjust the bulb’s depth to match the recommendations for your particular hosta variety.
- Backfill with Soil: Fill in the holes with soil, gently tamping it down to remove air pockets. Ensure that the bulbs are securely planted but not overly compacted.
- Water Thoroughly: After planting, water the hosta bulbs thoroughly to settle the soil and provide initial moisture. Keep the soil consistently moist as the bulbs establish themselves.
By gathering the necessary materials and properly preparing the planting site, you create the foundation for healthy hosta growth. The next steps will focus on planting the hosta bulbs and providing them with the care they need to flourish in your garden.
- Grenfell, Diana (Author)
- English (Publication Language)
- 212 Pages – 09/07/2007 (Publication Date) – Timber Press (Publisher)
Planting Hosta Bulbs
Now that you’ve prepared the planting site and gathered your materials, it’s time to plant your hosta bulbs. Follow these steps for successful hosta planting:
- Digging Holes: Using a shovel or a trowel, dig individual holes for each hosta bulb. The depth should be approximately twice the height of the bulb, and the width should allow for comfortable placement.
- Spacing: Consult the planting instructions for your specific hosta variety to determine the recommended spacing between bulbs. Typically, hostas are spaced around 18 to 24 inches apart to allow for healthy growth.
- Bulb Orientation: Place each hosta bulb into its respective hole with the growing points facing upward. Ensure that the top of the bulb is just below the soil surface.
- Backfilling: Gently fill the holes with soil, patting it down to eliminate air pockets. Be careful not to bury the bulbs too deeply; they should sit at the right level in the soil.
- Watering: After planting, water the newly planted hosta bulbs thoroughly. This helps settle the soil and ensures good initial moisture for the bulbs to establish their root systems.
- Labeling: If you’re planting different hosta varieties in the same area, consider using garden markers or labels to identify each one. This prevents confusion as they emerge and grow.
Mulching and Watering
Once your hosta bulbs are in the ground, it’s crucial to provide them with proper care to promote healthy growth. Here’s what you need to do:
- Mulching: Apply a layer of mulch around the planted hosta bulbs. This helps retain soil moisture, suppress weeds, and maintain consistent soil temperatures. Keep the mulch a few inches away from the hosta stems to prevent rot.
- Watering: Hostas require consistent moisture, especially during their initial growth period. Water your newly planted hosta bulbs regularly to keep the soil evenly moist. Avoid overwatering, which can lead to root rot, and allow the soil to dry slightly between waterings.

- ALL-IN-ONE NATURAL PLANT FERTILIZER: Medina 6-12-6 HastaGro is a comprehensive, all-natural plant fertilizer that combines essential nutrients in a balanced formula. This liquid fertilizer serves as a reliable food for plants, promoting healthy growth and vibrant blooms.
- GENTLE FORMULA FOR VERSATILE APPLICATION: Medina HastaGro’s gentle formula makes it ideal for both soil and foliar application. This versatile liquid fertilizer is designed to nourish your plants without causing harm, ensuring your plants thrive in any environment.
- PREVENTS SALT AND CHEMICAL BUILDUP: Medina HastaGro Plant Fertilizer helps prevent the accumulation of harmful salts and chemicals in the soil, promoting a healthier growing environment. This plant fertilizer keeps your soil balanced and your plants nourished.
- PROMOTES ROOT DEVELOPMENT: Medina HastaGro Plant Fertilizer is specially formulated to support strong root development, ensuring your plants establish a solid foundation for sustained growth. This plant fertilizer is ideal for all types of plants, enhancing their resilience and vitality.
- READY-TO-USE LIQUID FERTILIZER: Medina 6-12-6 HastaGro requires no assembly, making it a convenient food for plants. Simply apply this liquid fertilizer directly to your plants and soil, providing them with the essential nutrients they need for strong and vigorous growth.
Hosta Care and Maintenance
Hostas are relatively low-maintenance plants, but they still benefit from ongoing care and attention:
- Regular Watering: Continue to water your hosta plants consistently throughout the growing season, especially during dry spells. Aim to keep the soil evenly moist but not waterlogged.
- Fertilization: Hostas appreciate a balanced, slow-release fertilizer in the spring. Follow the recommended application rates on the fertilizer label to avoid overfeeding.
- Division: Mature hosta plants may become crowded over time. Dividing them every few years helps rejuvenate the plants and maintain their vitality. Division is best done in early spring or late summer.
- Pest and Disease Management: Keep an eye out for common hosta pests like slugs and snails. Consider natural methods or safe pest control products to manage them. Watch for signs of diseases such as leaf spot and take prompt action if needed.
- Adequate Shade: Ensure that your hostas receive the appropriate amount of shade or filtered sunlight, depending on their variety. Hostas that receive too much direct sun may experience leaf scorch.
By following these steps for planting hosta bulbs, mulching, and providing proper care and maintenance, you’ll create an environment where your hostas can thrive. These beautiful and versatile plants will reward your efforts with lush foliage and vibrant displays in your garden.
Protecting Hostas from Pests and Diseases
While hostas are relatively resilient, they can still fall victim to pests and diseases. Here’s how to protect your hostas:
- Slug and Snail Control: Slugs and snails are common hosta munchers. Use natural remedies like diatomaceous earth, copper barriers, or beer traps to deter these pests. Alternatively, consider using slug and snail baits.
- Deer and Rabbit Protection: If you have deer or rabbits in your area, protect your hostas with fencing or netting. There are also deer and rabbit repellent sprays available that can deter these animals.
- Leaf Spot and Mildew Prevention: Prevent fungal diseases like leaf spot and mildew by ensuring good air circulation around your hosta plants. Avoid overhead watering, and remove and dispose of any infected leaves promptly.
- Aphid and Insect Control: Aphids and other insects can occasionally infest hostas. Use insecticidal soap or neem oil to control these pests. Beneficial insects like ladybugs can also help keep aphid populations in check.
Enjoying Your Hosta Garden
As your hostas grow and flourish, you can enjoy their beauty in various ways:
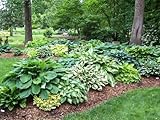
- Garden Design: Incorporate hostas into your garden design to create focal points, borders, or lush green backgrounds for other plants. Their diverse sizes, leaf shapes, and colors offer numerous design possibilities.
- Hosta Varieties: Explore the wide range of hosta varieties available, from tiny miniatures to giant specimens. Experiment with different hosta types to add diversity to your garden.
- Bloom Enjoyment: Some hosta varieties produce lovely, fragrant flowers. While hostas are primarily valued for their foliage, the blooms can add an extra dimension to your garden’s appeal.
- Garden Companions: Pair hostas with companion plants that complement their texture, color, and size. Consider planting shade-loving companions like ferns, heucheras, or astilbes.
Conclusion
Planting hosta bulbs and nurturing these elegant, low-maintenance plants can be a rewarding experience for gardeners of all levels. With the right location, proper care, and protection from pests and diseases, your hosta garden can thrive and bring beauty to your outdoor space.
Remember that hostas offer not only lush foliage but also versatility in garden design. Whether you want to create a serene shade garden or add interesting texture and color to your landscape, hostas can be a valuable addition.
By following the steps outlined in this guide and paying attention to the unique needs of your hosta varieties, you can cultivate a garden filled with these lovely, shade-loving plants. Enjoy the lush, vibrant foliage and the sense of tranquility they bring to your outdoor sanctuary.