Succulents, with their captivating shapes and low-maintenance appeal, have become beloved additions to gardens and indoor spaces worldwide. As any succulent enthusiast knows, these hardy plants occasionally require a change of scenery. Whether they’ve outgrown their current pots or you simply want to refresh their soil, transplanting succulents is a valuable skill for nurturing their health and vitality.
In this comprehensive guide, we embark on a journey through the art of transplanting succulents, providing you with the knowledge and techniques needed for a successful relocation. Whether you’re a seasoned gardener or a novice with a newfound love for succulents, learning how to transplant them properly is essential for their well-being. So, let’s get started by gathering the essential tools and materials required for this rewarding horticultural endeavor.

- Formulated to loosen clay and reduce caking
- Improves drainage and aeration
- Available in an 18qt size
Tools and Materials: Gathering Your Essentials
Before we dive into the intricacies of transplanting succulents, it’s crucial to assemble the necessary tools and materials. A well-prepared gardener is more likely to achieve success in this endeavor. In this section, we outline the essential items you’ll need:
- Pot or Container: We discuss the importance of selecting the right-sized pot or container with proper drainage to accommodate your succulent’s growth.
- Succulent Potting Mix: We explain why using a well-draining succulent potting mix is essential for preventing overwatering and root rot.
- Gardening Gloves: We recommend wearing gloves to protect your hands from sharp succulent spines and potential irritants in the soil.
- Trowel or Garden Scoop: We emphasize the usefulness of a trowel or garden scoop for scooping and distributing soil.
- Small Brush or Paintbrush: We suggest using a small brush to gently remove excess soil from the succulent’s leaves or rosettes.
- Newspaper or Drop Cloth: We advise laying down newspaper or a drop cloth to catch any soil spills and make cleanup easier.
- Optional Decorative Elements: We mention optional decorative elements like top dressings or decorative stones if you want to add a personal touch to your succulent’s new home.
By gathering these essentials, you’ll be well-prepared to embark on a successful succulent transplanting adventure. These tools and materials will serve as your trusted companions as we guide you through each step of the process, ensuring your succulents continue to thrive in their rejuvenated environment.
Step 1: Prepare Your Succulent and New Container
Transplanting your succulent begins with proper preparation of both the plant and the new container. Follow these steps to ensure a smooth start to the transplanting process:
- Choose the Right Time: Select a time during the growing season to transplant your succulent. Spring or early summer is often ideal, as this is when most succulents are actively growing.
- Select a Suitable Container: Pick a new container that is slightly larger than the current one. Ensure it has drainage holes to prevent waterlogging, a common issue for succulents. Prepare the new container by adding a layer of fresh succulent potting mix at the bottom.
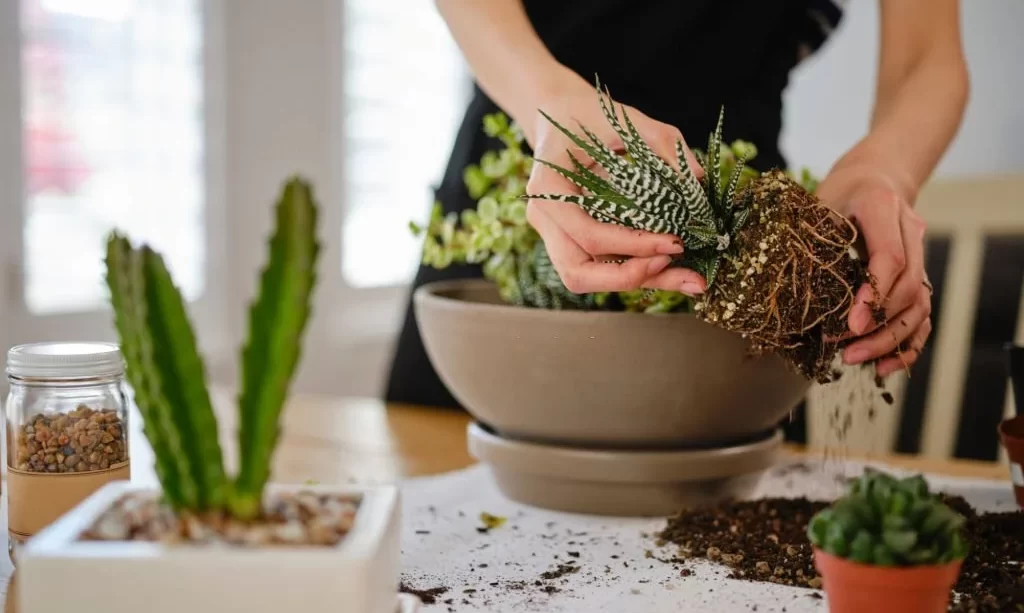
- Gently Remove the Succulent: Carefully remove the succulent from its current pot by gently squeezing the sides and tapping the bottom. You can also use a plastic knife or stick to help loosen the soil if the roots are stuck.
- Shake Off Excess Soil: Gently shake off excess soil from the succulent’s roots to expose them. Be cautious not to damage the roots during this process.
- Inspect for Root Health: Take a moment to inspect the roots for signs of health. Look for white or tan-colored roots, which indicate healthy growth. Trim any damaged or blackened roots with clean, sharp scissors or pruning shears.
- Position the Succulent: Place the succulent in the center of the new container, ensuring it sits at the same depth as it did in the old pot. Add more fresh succulent potting mix around the plant, gradually filling the container.
- Tamp Down Soil: Gently tamp down the soil around the succulent to secure it in place and remove air pockets. Leave about half an inch of space at the top of the container for watering.

- You will receive 200 pieces of red brick color plastic plant pots. Each one measures approx. 4″ outside diameter at top x 3″ bottom diameter x 3.6″ height, with 9 drainage holes at the bottom to keep soil drained and ventilated
- DEAYOU nursery pots are perfect for starting seedlings, transplanting seedlings from smaller cells into these containers, indoor or outdoor plants, vegetables, flowers, cuttings, professional seed cultivation, succulent propagation
- Our seed starting pots are made of durable flexible thin plastic, they are shatterproof and can be restored to the original shape by hand once deformed. We increased the number of drainage holes to facilitate drainage and gas flow, prevent root rot, and improve the survival rate of the nursery
- Our plant containers are great for greening projects, home gardening, garden nursery, urban landscape plant cultivation, flower display in shopping malls, yard, porch, balcony, greenhouse and more
- These plastic flower pots with top raised rim design allow you to easily handle and stack them, saving space when not in use. The red brick exterior and dark interior color can prevent ultraviolet, practical and beautiful
Step 2: Soil and Root Inspection
Once you’ve successfully prepared the succulent and its new container, it’s time to focus on the soil and root inspection. This step is crucial for ensuring the health of your transplanted succulent:
- Examine the Soil: Assess the quality and condition of the succulent potting mix you’re using. It should be well-draining and designed specifically for succulents. If it appears old, depleted, or compacted, consider replacing it with fresh potting mix.
- Check Root Health: Inspect the succulent’s roots again, paying close attention to their condition. Healthy roots should be firm, white, and free of any mushiness or foul odors. Address any issues you find, such as root rot or overcrowded roots.
- Loosen the Roots (if necessary): If the succulent has densely packed roots or is root-bound, gently loosen the roots with your fingers. This helps them adapt to the new soil and encourages healthy growth.
- Remove Excess Soil: Use a small brush or paintbrush to remove any excess soil from the succulent’s leaves or rosettes. This not only improves the plant’s appearance but also reduces the risk of rot or pests.
By carefully preparing your succulent and inspecting both the soil and roots, you’re setting the stage for a successful transplanting process. These steps ensure that your succulent will have a healthy start in its new container, encouraging vigorous growth and long-lasting beauty.

- CACTUS PLANTING MIX: This cactus soil potting mix is formulated to be the perfect growing vessel for all your household cacti and succulents. We’ve taken steps to ensure this cactus potting mix creates the ideal environment in which any cacti, succulents, palm, or citrus plants can thrive.
- NUTRIENT ENRICHED: Our cactus mix potting soil includes eight-month’s worth of time-released nutrients to act as a natural fertilizer/food for your budding succulents. They come in the form of small yellow balls containing the macro-nutrients nitrogen (N), phosphorus (P), and potassium (K).
- PH BALANCED: We ensure that our cacti soil potting mix comes at the perfect pH level for all cacti and succulents to thrive in. Cacti and succulents prefer a fairly neutral pH that leans more towards acidity, which is exactly the environment that we provide with our cactus soil mix.
- OPTIMUM DRAINAGE: Succulents by nature can survive on less water, which is why they need well-draining soil to grow as healthily as possible. We ensure that our succulent soil potting mix has the proper drainage for cacti roots to exist in their optimum condition, without the risk of rotting.
- INDOOR OR OUTDOOR USE: You can use this succulent soil mix in containers kept indoors or outside. Cacti are a great houseplant, but you can also enjoy that desert look and feel in your backyard or on your patio. Just fill a container with succulent potting soil, plant your seeds, and get to growing!
Step 3: Repotting the Succulent
With your succulent and new container prepared, it’s time to proceed with the repotting process. This step ensures that your succulent is comfortably settled into its new home for healthy growth:
- Place the Succulent: Gently place the succulent in the center of the new container, positioning it at the same depth as it was in the previous pot. Ensure that the succulent is upright and centered.
- Add Fresh Potting Mix: Begin adding fresh succulent potting mix around the succulent. Gradually fill the container, making sure the roots are well-covered but not buried too deeply. Leave approximately half an inch of space at the top to accommodate watering.
- Tamp Down the Soil: Use your fingers or a gentle patting motion to tamp down the soil around the succulent. This helps secure the plant in place and eliminates any air pockets that may have formed.
- Check for Stability: Gently give the succulent a slight wiggle to ensure it’s securely anchored in the new soil. Make any necessary adjustments to its positioning if needed.
- Optional Decorative Elements: If desired, you can add decorative elements like top dressings, decorative stones, or pebbles around the succulent to enhance its appearance and provide additional support.
Step 4: Watering and Care After Transplant
Proper watering and aftercare are essential to ensure your transplanted succulent thrives in its new environment. Follow these guidelines for a successful post-transplant period:
- Initial Watering: After repotting, give your succulent a thorough but gentle watering. Ensure the water reaches the root zone. Allow excess water to drain from the container’s bottom.
- Dry Period: Succulents prefer to dry out between waterings. Wait until the top inch or two of soil is completely dry before watering again. Overwatering is a common mistake that can harm your succulent.
- Adjust Watering Frequency: Monitor your succulent’s moisture needs. Depending on environmental conditions, such as humidity and temperature, you may need to adjust your watering schedule.
- Provide Adequate Sunlight: Place your transplanted succulent in a location with bright, indirect sunlight. Most succulents thrive in well-lit areas. Avoid placing them in direct, scorching sun immediately after transplanting.
- Monitor for Stress: Keep an eye on your succulent for the first few weeks after transplanting. Some stress, such as slight leaf wrinkling or color change, is normal. However, if you notice severe wilting or other concerning signs, adjust care accordingly.
- Avoid Disturbance: Minimize handling or moving your succulent in the weeks following transplanting. Let it acclimate to its new environment without unnecessary disturbances.
By carefully repotting your succulent and providing appropriate watering and care after transplanting, you give your plant the best chance for a smooth transition and continued healthy growth. Remember that patience and consistent care are key to a thriving succulent in its new home.

- Instantly feeds succulent plants, including cacti
- For all cacti, jade, aloe and other popular succulents
- Feeds instantly
- Able to apply directly to the soil or can mix with water
- Feed every 2 weeks
Step 5: Additional Tips and Considerations
As you embark on your journey of transplanting succulents, consider these additional tips and considerations to enhance your success and the well-being of your beloved plants:
- Protect from Extreme Temperatures: Shield your newly transplanted succulent from extreme temperatures, especially direct sunlight and frost. Gradually introduce it to its new light conditions to prevent sunburn.
- Avoid Overwatering: Succulents are susceptible to overwatering, which can lead to root rot. Always err on the side of underwatering and adjust your watering schedule based on your succulent’s specific needs.
- Use Well-Draining Soil: Ensure your succulent is potted in well-draining soil. Consider adding perlite or coarse sand to the potting mix to improve drainage further.
- Fertilize Sparingly: During the first few weeks after transplanting, refrain from fertilizing your succulent. Once it has settled and shows signs of new growth, you can start a light fertilization regimen.
- Rotate for Balanced Growth: To encourage even growth and prevent leaning or stretching toward the light, rotate your succulent periodically.
- Regularly Check for Pests: Keep an eye out for pests such as mealybugs, aphids, or spider mites. Early detection and treatment are crucial to prevent infestations.
- Patience Is Key: Understand that succulents may take some time to fully adapt to their new environment. Be patient and allow them the time they need to thrive.
Conclusion
Transplanting succulents is a rewarding endeavor that allows you to rejuvenate and revitalize these captivating plants. By following the steps outlined in this guide and considering the additional tips and considerations, you are well-prepared to ensure a smooth transition for your succulents. As they settle into their new containers with fresh soil, you have the opportunity to watch them thrive, grow, and continue to grace your indoor and outdoor spaces with their unique beauty.
Remember that each succulent is unique, and its care requirements may vary. Observing your plants and responding to their specific needs is an essential aspect of successful succulent cultivation. With patience, attention to detail, and a genuine love for these hardy plants, you can enjoy a flourishing succulent garden that continues to bring joy and natural beauty into your life.
Happy gardening, and may your transplanted succulents thrive and thrive!