Okra (Abelmoschus esculentus), with its distinctive green pods and versatility in culinary uses, is a staple in gardens and kitchens around the world. Beyond its immediate nutritional benefits, saving okra seeds offers gardeners the opportunity to ensure a continuous supply of this beloved vegetable. The process of saving seeds not only contributes to sustainability but also allows for the preservation of specific varieties that thrive in local conditions. This guide will walk you through the essential steps of selecting the right pods, harvesting seeds, and preparing them for future planting seasons.
Okra Plants
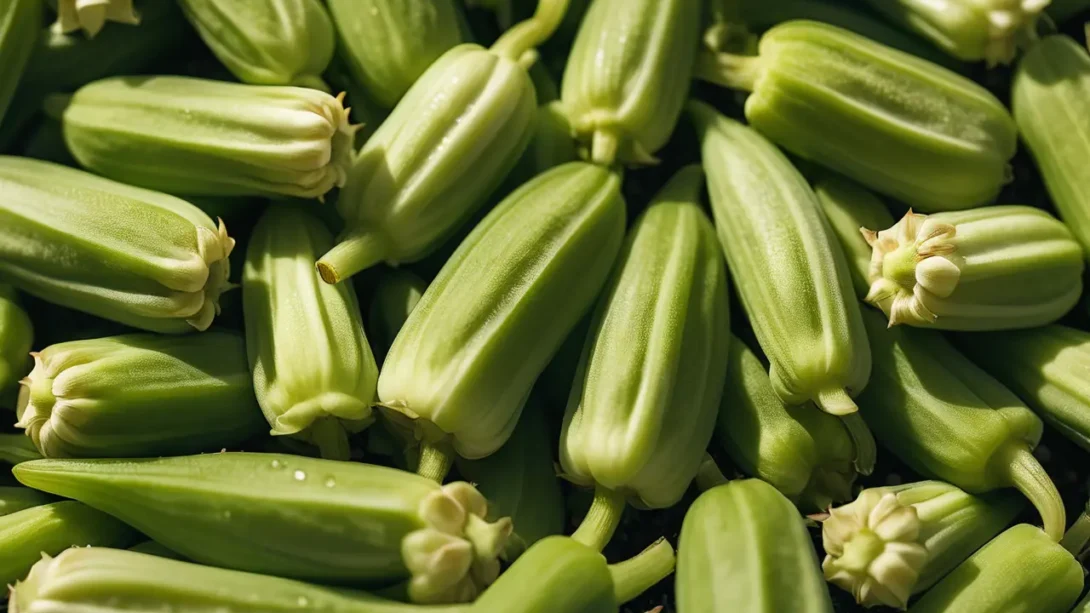
Okra plants, known for their heat tolerance and preference for warm climates, produce large, hibiscus-like flowers that eventually give way to the familiar edible pods. These plants follow a predictable lifecycle from germination to flowering and pod development, typically reaching maturity in 50 to 60 days under optimal conditions. For seed-saving purposes, it’s crucial to focus on heirloom or open-pollinated varieties, as seeds from hybrid plants may not produce true-to-type offspring, leading to unpredictable crop characteristics.
The key to successful seed saving begins with understanding the signs of a pod that’s ready for seed harvesting. Unlike pods picked for eating, which are best harvested when young and tender, pods destined for seed saving should be allowed to mature fully on the plant. This maturation is crucial for the development of viable seeds capable of germinating in the next planting season.
Selection of Okra Pods for Seed Saving
The first step in saving okra seeds is selecting the best pods. Ideal candidates are those that are healthy, well-formed, and from vigorously growing plants. These criteria ensure that the seeds have the best genetic makeup for producing robust plants in the future.
- Criteria for Selection: Look for pods that are firm, unblemished, and have reached their full size. The pods should remain on the plant until they’ve become dry and brittle, which typically occurs well after the plant has stopped producing new flowers.
- Timing for Pod Selection: The timing is critical; pods should be allowed to grow beyond the stage of edibility and left on the plant until they are dry. This process can take several weeks, depending on the climate and weather conditions.
- Marking and Tracking: To keep track of the best specimens for seed saving, consider tying a piece of yarn or placing a tag around the stem of selected pods. This marking will help you identify which pods to leave for seed harvesting as you continue to pick others for consumption.
Harvesting Okra Seeds
Once the pods have dried on the plant, it’s time to harvest the seeds. This stage is typically reached in late summer to early fall, as the growing season winds down.
- Harvesting Time: Choose a dry, sunny day to harvest the pods. The lack of moisture is crucial to prevent the seeds from molding during the drying process.
- Extracting Seeds: Wearing gloves can protect your hands from the pod’s spiny surface. Cut or gently break open the dry pods over a clean, flat surface. Inside, you’ll find rows of round, white seeds. Carefully remove these seeds from the pod, being mindful to discard any that look discolored, shriveled, or damaged.
- Cleaning Seeds: Once extracted, the seeds may be covered in residual pod material. Gently blow away the chaff or use a fine mesh sieve to separate the seeds from the debris. Clean seeds are crucial for preventing mold and pests during storage.
Drying and Curing Okra Seeds
After harvesting, okra seeds must be properly dried to ensure their longevity and viability for future planting. This step is crucial to prevent mold growth and to prepare the seeds for storage.
- Setting Up a Drying Area: Choose a well-ventilated, dry area away from direct sunlight. A room with consistent temperature and low humidity is ideal. Spread the seeds in a single layer on a clean, dry surface, such as a screen or a piece of paper.
- Turning Seeds Regularly: To ensure even drying, gently stir or turn the seeds daily. This practice helps prevent clumping and ensures each seed receives adequate air exposure.
- Testing for Dryness: Properly dried seeds will be hard and will not dent when pressed. The drying process can take anywhere from a few days to a couple of weeks, depending on the ambient humidity and temperature. Seeds that are not fully dried can spoil or fail to germinate.
Storing Okra Seeds
Once the seeds are thoroughly dried, they can be stored until the next planting season. Proper storage is essential to maintain seed viability.
- Choosing Storage Containers: Use airtight containers, such as glass jars with tight-fitting lids, to protect seeds from moisture and pests. Small envelopes or zip-lock bags can also be used, provided they are kept in a cool, dry place.
- Labeling Seeds: Clearly label each container with the variety of okra and the date of harvest. This information is invaluable for future planting decisions and for tracking seed viability over time.
- Ideal Storage Conditions: Store your seed containers in a cool, dry place. The temperature should be consistent, ideally between 32-41°F (0-5°C). Some gardeners use a refrigerator or a cool basement for storage.
Testing Seed Viability
Before planting season arrives, it’s wise to test the viability of your stored okra seeds, especially if they’ve been stored for more than a year.
- Germination Test: Place a few seeds on a moist paper towel, fold it over the seeds, and put it in a plastic bag. Keep the bag in a warm place and check regularly for germination. Seeds that sprout within a week to ten days are viable and can be planted.
- Water Test: Some gardeners use a water test, where seeds are placed in a container of water. Those that sink are generally viable, while those that float may not be. However, the germination test is more reliable for assessing seed viability.
Testing seed viability not only helps gauge the success rate of your saved seeds but also informs how densely you might plant them. Seeds with lower germination rates may be sown more thickly to ensure adequate plant emergence.
The process of drying, storing, and testing okra seeds is integral to successful garden planning and sustainability. By carefully following these steps, gardeners can ensure a robust crop of okra for years to come. In the final section, we’ll address troubleshooting common issues that may arise during the seed saving process, ensuring you’re well-prepared to handle any challenges.
Troubleshooting Common Issues
Saving okra seeds, like any gardening endeavor, can sometimes present challenges. Here are solutions to some common issues you might encounter:
- Moldy Seeds: If seeds become moldy during the drying process, it often indicates that they were not adequately dried before storage or were stored in a humid environment. To prevent this, ensure seeds are completely dry and store them in airtight containers in a cool, dry place. If mold is detected early, spreading the seeds out in a well-ventilated area and allowing them to dry further may salvage some.
- Pests in Storage: Pests such as weevils can sometimes infest stored seeds. Using airtight containers and storing seeds in the refrigerator or freezer can prevent pest infestations. If pests are discovered, discard the affected seeds to prevent them from damaging the rest of your collection.
- Low Germination Rates: If seeds have low germination rates, it may be due to improper drying, storage, or the age of the seeds. Always test seed viability before planting and consider sowing extra seeds if viability is in question. Remember, the fresher the seed, the higher the germination rate.
Aftercare for Saved Seeds
Proper aftercare is crucial to maintaining the viability of saved okra seeds. Here are a few additional tips to ensure your seeds are in the best condition for planting:
- Regular Viability Testing: Perform germination tests annually, especially if you plan to store seeds for multiple years. This practice helps you assess the seed stock’s health and decide when it’s time to refresh your supply.
- Rotate Seed Stock: Use older seeds first and add new seeds to your collection each year. This rotation ensures that you always have a supply of viable seeds on hand.
- Share and Exchange Seeds: Sharing seeds with fellow gardeners can be a great way to diversify your crop and try new varieties. Seed exchanges also offer an opportunity to learn from others’ experiences in seed saving and gardening.
Conclusion
Saving okra seeds is a rewarding practice that contributes to sustainability, preserves biodiversity, and enhances food security. By carefully selecting pods, properly drying and storing seeds, and addressing any issues promptly, gardeners can ensure a healthy supply of okra for future planting seasons. Whether you’re a seasoned gardener or new to the world of seed saving, the process of harvesting okra seeds offers a deeper connection to the cycle of growth and renewal in your garden. With patience and care, you can cultivate a thriving okra crop that reflects the best of your gardening efforts and the unique characteristics of your local environment.