Hoyas, often celebrated for their stunning foliage and exquisite, star-shaped flowers, have captivated the hearts of houseplant enthusiasts worldwide. Propagating Hoya plants is not only a practical method for enhancing plant health and expanding your collection but also a rewarding experience that deepens your connection with these charming specimens. This guide aims to demystify the process, offering step-by-step instructions on several propagation methods to help both novices and seasoned gardeners alike.
Hoya Plants
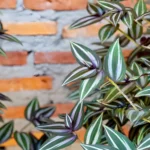
Hoyas, belonging to a large family of evergreen climbers, are admired for their waxy leaves and beautiful, fragrant flowers. They are relatively easy to care for, thriving in bright, indirect light and requiring minimal watering, making them ideal for indoor gardening. The allure of Hoyas extends beyond their visual appeal; propagation is a significant aspect of their care, allowing gardeners to share and expand their collections. Understanding the specific needs and characteristics of Hoya plants is the first step toward successful propagation.
Preparation for Propagation
Choosing the right time for propagation is crucial. Spring and early summer offer the best conditions, as longer daylight hours and warmer temperatures support vigorous growth. Before you begin, ensure you have the necessary tools at hand: sharp, clean scissors or pruning shears, small pots, appropriate potting mix, and a clear plastic bag or container for humidity control.
Selecting a healthy mother plant is paramount. Look for Hoyas with robust growth, free of pests and diseases. Healthy stem sections, especially those with new growth, are ideal candidates for propagation, as they tend to root more readily and grow vigorously.
Propagation Methods
A variety of methods can be employed to propagate Hoyas, each with its unique advantages. Whether you choose soil, water, or layering techniques, the key is to provide the right conditions for root development and growth.
Stem Cuttings in Soil
Soil propagation is a popular method for Hoyas due to its simplicity and effectiveness. Here’s a step-by-step guide:
- Selecting Cuttings: Identify a healthy stem with at least 2-3 nodes (points where leaves attach to the stem). Nodes are critical as they contain the meristematic tissue where new roots and shoots originate.
- Preparation: Fill a small pot with a well-draining potting mix, ideally one that retains moisture yet allows excess water to escape. Pre-moisten the soil before planting.
- Planting: Using clean scissors or shears, cut the selected stem just below a node. Remove the lower leaves to prevent them from touching the soil, which could lead to rot. Plant the cutting in the pot, ensuring at least one node is buried in the soil, as this is where roots will develop.
- Care: Place the pot in a warm spot with bright, indirect light. Covering the pot with a clear plastic bag can create a humid environment that encourages rooting. Water sparingly, just enough to keep the soil slightly moist, and avoid waterlogging.
Stem Cuttings in Water
Water propagation is an appealing method for many Hoya enthusiasts due to its simplicity and the visual pleasure of watching roots develop. This method is especially useful for those who wish to monitor the rooting process closely.
- Prepare the Cuttings: Choose a healthy stem from the Hoya plant, ensuring it has at least 2-3 nodes. Use clean scissors or shears to cut the stem, and remove leaves that might sit below the water level to prevent decay.
- Water Setup: Fill a clear glass or jar with room temperature water, ensuring that at least one node will be submerged. Some gardeners add a small amount of liquid rooting hormone to the water to encourage root growth, although this is optional.
- Root Development: Place the glass in a location with bright, indirect light. Change the water every few days to keep it clean and oxygenated, which is crucial for preventing rot and encouraging healthy root development.
- Transplanting: Once the roots have grown to a few inches in length, which usually takes a few weeks, the cutting is ready to be potted in soil. Choose a well-draining potting mix and a suitable container with drainage holes to prevent waterlogged conditions.
Layering Method
The layering method is a less common but highly effective way to propagate Hoyas, particularly for those varieties that are more reluctant to root. This method involves encouraging a stem still attached to the mother plant to root before severing it and potting it up as a new plant.
- Choose a Suitable Stem: Select a long, healthy stem that can be easily bent down to the soil level in the same pot or a pot nearby without breaking.
- Prepare the Site: Lightly scratch the stem’s bark at a node where you want roots to form, being careful not to sever the stem. This action encourages the plant to focus its energy on root production at that site.
- Secure the Stem: Using a hairpin or similar object, gently secure the wounded part of the stem into the soil. You may need to use additional potting mix to cover the node adequately.
- Wait for Roots to Develop: Keep the soil moist and wait for roots to develop at the node. This process can take several weeks to a few months, depending on the Hoya species and environmental conditions.
- Sever and Pot Up: Once a healthy root system has developed, carefully sever the new plant from the mother plant and pot it up separately.
Aftercare for Propagated Plants
After your Hoya cuttings have successfully rooted and been potted, they’ll need proper care to grow into strong, healthy plants. Here are essential aftercare tips:
- Watering: Newly potted Hoyas should be watered just enough to keep the soil moist but not soggy. Over-watering can lead to root rot, particularly in young plants with developing root systems.
- Light Requirements: Provide your new Hoyas with bright, indirect light. Too much direct sunlight can scorch their leaves, while too little light can lead to leggy growth and reduced vigor.
- Humidity: Hoyas thrive in a humid environment. Consider placing your pots on a pebble tray filled with water or using a humidifier to maintain high humidity levels around your plants.
Troubleshooting Common Propagation Issues
Propagating Hoyas is generally straightforward, but like all gardening endeavors, it can sometimes present challenges. Here are solutions to some common issues you might encounter:
- Root Rot in Water Propagation: If you notice the roots turning brown and mushy, the cutting may be suffering from root rot, often due to stagnant water or poor hygiene. To salvage the cutting, trim off the rotted roots and transfer it to fresh water, ensuring you change the water regularly.
- Slow Rooting: Some Hoya varieties take longer to root, especially in cooler conditions. Ensure your cuttings are kept in a warm spot with bright, indirect light. Patience is key, as rooting can sometimes take several weeks to months.
- Leaf Drop: If your Hoya cutting starts dropping leaves, it could be due to stress from too much direct sunlight, over-watering, or a drastic change in environment. Adjust the care accordingly, focusing on mimicking the conditions of the mother plant as closely as possible.
- Pests and Diseases: Keep an eye out for signs of pests and diseases, such as aphids, mealybugs, or fungal infections. Early detection and treatment with appropriate measures can prevent these issues from escalating and harming your new plants.
Conclusion
Propagating Hoyas is a fulfilling activity that allows gardeners to multiply their collection and share with others. Through methods like stem cuttings in soil, water propagation, and layering, gardeners can explore various approaches to find what works best for their conditions and Hoya varieties. Remember, the key to successful propagation lies in providing the right care during and after the process, including maintaining appropriate moisture levels, ensuring adequate light, and monitoring for pests and diseases.
As you become more experienced in Hoya propagation, you’ll not only expand your plant collection but also deepen your understanding and appreciation for these fascinating plants. Each new Hoya you propagate becomes a testament to your gardening skills and the joy of plant care.
Whether you’re a seasoned Hoya collector or a novice eager to start, the process of propagation offers a unique opportunity to engage with your plants on a deeper level. So, gather your cuttings, prepare your pots, and embark on the rewarding journey of Hoya propagation.