Peonies, with their lush, extravagant blooms and sweet fragrance, are cherished by gardeners and flower enthusiasts around the world. These perennial beauties not only captivate with their stunning appearance but also have a remarkable ability to brighten any garden. If you’ve ever dreamt of having more of these enchanting flowers in your garden or sharing their splendor with friends and family, you’re in luck. This article is your guide to the wonderful world of peony propagation, a process that allows you to multiply your peony collection and bring more of these timeless blossoms into your life.

- Quenched, Versatile: The 65 – manganese steel is quenched. It can withstand high – intensity work and is suitable for hard soil, tangled grass roots and rocky yards
- Rubber – wrapped, Ergonomic: The full – tang handle is wrapped on the outside with a new – type non – slip rubber sleeve. It is ergonomically designed, offering a comfortable hand – feel and being anti – slip
- Hand – welded, Durable: The handle and shovel surface are purely hand – welded without any seams. The welding spots are solid and durable
- Best – value, Unrivaled: This garden shovel is the best one at this price. There is no other that can compare to it. I hope it can help you put an end to the never – ending search and purchase
- Sturdier, Superior: It is sturdier and more durable than other shovels with wooden or plastic handles available on the market
Peony Propagation
Peony propagation is the art and science of creating new peony plants from existing ones. This can be achieved through various methods, including division, seeds, and cuttings. While each method has its merits, division is the most common and reliable way to propagate peonies. In the following paragraphs, we will explore the step-by-step process of dividing and transplanting peonies, enabling you to grow new peony plants with confidence and success. Whether you’re a seasoned gardener or just beginning your horticultural journey, peony propagation is a delightful endeavor that allows you to share the magic of these blooms with the world.
Tools and Materials
Before you embark on the rewarding journey of peony propagation, gather the essential tools and materials you’ll need:
- Spade: A sturdy garden spade will be your primary tool for digging and dividing the peony plant.
- Pruners: Quality pruners or garden shears will help you trim the foliage and roots.
- Tarp or Ground Cover: Lay down a tarp or ground cover to collect soil and make cleanup easier.
- Pots or Containers: You’ll need pots or containers for transplanting the peony divisions.
- Gloves: Protect your hands with gardening gloves, especially when handling the peony’s root system.

- Durable Wooden Stand: The plant terrariums frame is excellently crafted with natural wood for durability and stability while highlighting nature and rustic beauty.
- Premium Glass Tubes: The test tubes bud vase comes with 9 removable glasses that are made of premium quality, smooth, transparent, beautifully shaped glasses.
- Wall Mounted Hanging Planter: 2pcs Wooden stand and 5 Test Tubes allow you to mount and hang the planter on a wall for decorative purposes.
- Wide Application: Great for plants such as African violets, Flowers, Photos vine, Scindapsus, Pothos vine, Lucky Bamboo. Ideal for adding elegance and beauty to your garden, office, living room or wedding party.
- Warranty: If you receive damaged or not satisfied with your purchase, please contact us. We will replace it or refund right away.
Step 1: Choose the Right Time
Timing is crucial when it comes to peony division. Follow these steps to choose the right time for propagation:
- Early Autumn is Ideal: The best time to divide peonies is typically in early autumn, preferably in September or early October. This timing allows the plant to establish new roots before winter.
- Wait for Dormancy: Wait until the peony plant has gone dormant. You’ll know it’s dormant when the foliage has died back, and the plant shows no active growth.
Step 2: Prepare the Peony Plant
Properly preparing the peony plant is essential for a successful division process. Here’s what to do:
- Cut Back Foliage: Use your pruners to trim back the foliage of the peony plant to about 3-4 inches above the ground. This reduces the stress on the plant during division.
- Expose the Root System: Gently dig around the peony plant’s perimeter, keeping a distance of about 6-12 inches from the base to avoid damaging the roots. Create a shallow trench around the plant.
With your peony plant prepared, you’re ready to proceed with the division process, ensuring that each new division will thrive and bloom in the seasons to come.
Step 3: Dig Up the Peony
With the peony plant prepared, it’s time to carefully dig it up from its current location:
- Use Your Spade: Insert your spade into the trench you created around the peony plant.
- Lift Gently: Gently lift the peony from the ground, taking care not to damage the roots. You may need to rock the plant back and forth to loosen it.
- Shake Off Excess Soil: Once the peony is out of the ground, shake off excess soil to reveal the root system. Be gentle to avoid damaging the roots.
Step 4: Divide the Plant
Now that you have the peony out of the ground, you can proceed with dividing it into smaller sections:
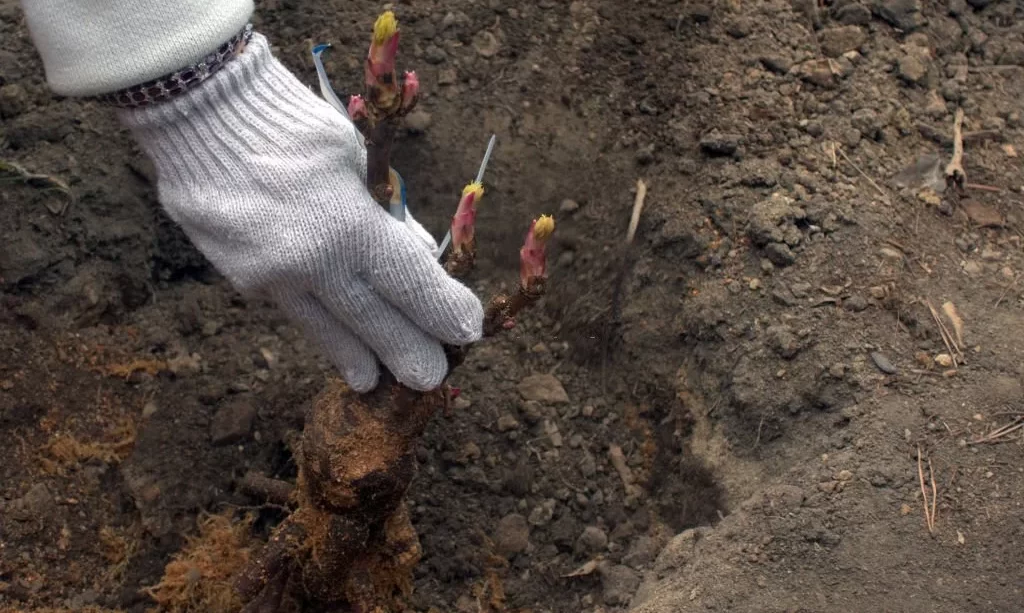
- Inspect the Roots: Examine the root system and identify natural divisions or sections where the roots can be separated. Each section should have healthy roots and at least one bud or “eye”.
- Use Pruners: Use your pruners or a sharp, clean knife to carefully cut the peony root system into sections, ensuring that each division has a viable bud or “eye”. Aim for 3-5 divisions, depending on the size of the original plant.
- Trim Roots and Foliage: Trim any damaged or excessively long roots and any remaining foliage on the divisions, leaving only a few inches of stem above the bud.
Step 5: Plant the Divisions
Now that you have your peony divisions, it’s time to plant them in their new location:
- Choose a Suitable Location: Select a well-drained and sunny or lightly shaded spot for your peony divisions. Ensure the soil is rich and amended with compost.
- Dig Planting Holes: Dig holes for each division, making them deep enough to accommodate the roots comfortably and allowing the bud or “eye” to be no more than 2 inches below the soil surface.
- Position and Backfill: Place each division in its hole, spreading the roots out. Backfill the hole with soil, gently firming it around the division. Water thoroughly to settle the soil.
- Spacing: Ensure proper spacing between divisions, typically 3-4 feet apart, to allow for healthy growth and airflow.
- Mulch and Water: Apply a layer of mulch around the newly planted divisions to retain moisture and deter weeds. Water the area well to provide initial hydration.
With your peony divisions planted, you’re on your way to nurturing new, thriving peony plants that will grace your garden with their stunning blooms. Remember that it may take a year or more for these divisions to establish and bloom, so be patient and continue to care for them diligently.
Step 6: Water and Mulch
After planting your peony divisions, proper watering and mulching are crucial for their well-being:
- Watering: Water the newly planted divisions thoroughly immediately after planting to settle the soil. Keep the soil consistently moist but not waterlogged during the growing season.
- Mulching: Apply a layer of organic mulch, such as wood chips or straw, around the peony divisions. Mulch helps retain moisture, regulate soil temperature, and deter weed growth.
Step 7: Care and Patience
Caring for your newly propagated peonies requires attention and patience:
- Regular Watering: Throughout the growing season, ensure the soil remains consistently moist. Water deeply when needed, especially during dry spells.
- Fertilization: Apply a balanced, slow-release fertilizer in the spring to provide essential nutrients.
- Staking: Depending on the peony variety, some may benefit from staking to support heavy blooms and prevent bending or breakage.
- Deadheading: Remove spent blooms to encourage continuous flowering and maintain the plant’s appearance.
- Winter Protection: In colder climates, add a layer of mulch over the peony divisions in late fall to protect them from freezing temperatures.

- Lilly Miller Bulb & Bloom Food 4-10-10 4lb The combination of phosphorus and potassium will give bright, vigorous blooms
- Slow release feeding
- This product is made in United States
Conclusion
Peony propagation through division is a rewarding endeavor that allows you to multiply these exquisite blooms in your garden. By following the step-by-step process outlined in this guide and providing proper care and attention, you can watch your newly propagated peonies thrive and grace your garden with their stunning, fragrant blossoms. Remember that peonies may take a year or more to establish and bloom after propagation, so exercise patience and enjoy the anticipation of the floral beauty that awaits. As you nurture your peonies, you’ll gain not only a deeper appreciation for these timeless flowers but also the satisfaction of creating a flourishing garden for years to come.