Purple hull peas, a cherished variety within the Southern United States, have long been celebrated for their rich, nutty flavor and nutritional benefits. These peas, technically beans, are a type of cowpea (Vigna unguiculata subsp. unguiculata) and boast a remarkable ability to thrive in hot, humid climates, making them a staple in summer gardens. Beyond their culinary versatility — from fresh salads to hearty stews — purple hull peas enrich the soil by fixing nitrogen, enhancing garden health and sustainability. This guide aims to equip you with the knowledge to successfully plant, grow, and harvest purple hull peas, ensuring a bountiful addition to your garden.
Purple Hull Peas
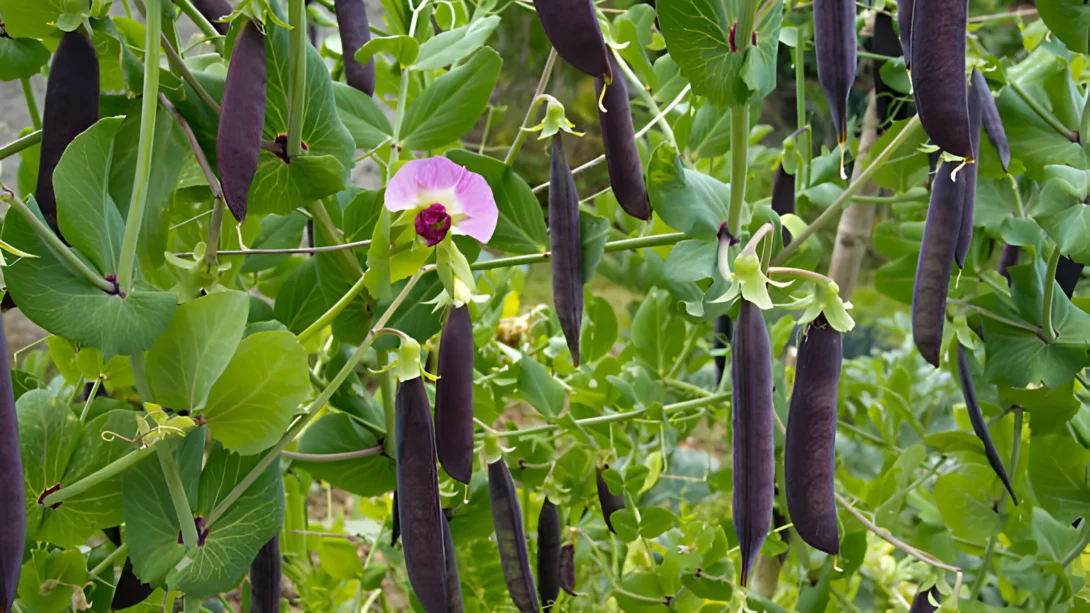
Purple hull peas are distinguished by their vibrant purple-tinged pods, encasing cream-colored peas with a taste superior to many other legumes. They are closely related to black-eyed peas but are preferred by many gardeners for their sweeter flavor and faster cooking time. These peas are not only a source of high-quality protein but also rich in fiber, vitamins, and minerals, contributing to a balanced diet.
One of the key characteristics of purple hull peas is their resilience. They can withstand conditions that would stress many other plants, including high temperatures and drought, once established. This makes them an excellent choice for gardeners in warmer climates or those looking to extend their garden’s productivity through the heat of summer.
Choosing the Right Planting Site
To ensure the success of your purple hull peas, selecting an appropriate site is crucial. These peas flourish in areas that receive full sun, meaning at least six hours of direct sunlight daily. The ideal site will also have well-draining soil to prevent waterlogging, which can lead to root diseases.
Soil quality plays a significant role in the growth of purple hull peas. They prefer a soil pH between 6.0 and 7.5. If you’re unsure about your soil’s pH, a simple test can provide this information. Enhancing your soil with organic matter, such as compost or rotted manure, can improve soil fertility and structure, offering an excellent start for your peas.
When to Plant Purple Hull Peas
Timing is everything when it comes to planting purple hull peas. In general, they should be sown directly into the garden after the last frost of spring, when the soil has warmed to at least 65°F (18°C). In many regions, this means planting can take place from late spring to early summer. However, because purple hull peas thrive in warm conditions, gardeners in hot climates can enjoy a longer planting window, often through mid-summer.
The peas typically require between 60 to 90 days to reach maturity, depending on the variety and growing conditions. Planning your planting time with this maturation period in mind can help ensure a harvest before any fall or winter frosts.
Planting Process
Beginning with high-quality seeds is paramount for the success of your purple hull peas. Opt for seeds that are disease-free and have a high germination rate to maximize your garden’s potential. Before planting, prepare your soil by loosening it to a depth of about 8 inches and mixing in organic matter to improve fertility and drainage. This preparation encourages deep, healthy root development essential for drought tolerance and nutrient uptake.
When sowing the seeds, plant them 1 to 2 inches deep and space them about 3 inches apart in rows. Rows should be spaced approximately 2 to 3 feet apart to allow for adequate air circulation and room for growth. After planting, water the seeds thoroughly to encourage germination, which typically occurs within 7 to 10 days under optimal conditions.
Caring for Your Purple Hull Peas
After your purple hull peas have been planted, consistent care is necessary to ensure a healthy and productive crop. Here are some key aspects of pea care to keep in mind:
- Watering Schedule: Purple hull peas require a moderate amount of water, especially during germination and early growth stages. Aim to keep the soil consistently moist but not waterlogged. Once established, they are somewhat drought-tolerant, but regular watering during dry spells will promote continuous pod production. Avoid overhead watering to minimize leaf diseases, opting instead for drip irrigation or soaker hoses that deliver water directly to the soil.
- Fertilizing: These peas generally require little to no additional fertilizer if planted in well-amended soil, thanks to their ability to fix atmospheric nitrogen. However, a light application of a balanced fertilizer at planting time can help give them a good start, especially in poor soils. Be cautious with nitrogen-rich fertilizers, as excessive nitrogen can promote leaf growth at the expense of pod production.
- Mulching: Applying a layer of organic mulch around the plants can help retain soil moisture, suppress weeds, and regulate soil temperature. Materials such as straw, shredded leaves, or pine needles are effective mulches for purple hull peas.
- Pest and Disease Management: While purple hull peas are relatively hardy, they can be susceptible to certain pests and diseases. Common pests include aphids, which can be controlled with insecticidal soap, and bean beetles, which may require manual removal or the use of organic pesticides. Diseases like root rot and powdery mildew can be minimized by ensuring good soil drainage and adequate plant spacing. Regularly inspecting your plants and taking early action against pests and diseases will help keep your crop healthy.
Harvesting and Storing
Knowing when and how to harvest your purple hull peas will greatly affect their quality and flavor. Here are some tips for harvesting and storing your peas:
- Signs of Readiness: Harvest time for purple hull peas can vary, but generally, pods are ready when they are swollen, showing the shape of the peas inside, and have a purple hue. The pods should still be tender, not dry or overly hard. For shelling peas, wait until the pods are fully mature and the peas inside are firm.
- Harvesting Technique: Gently hold the vine with one hand and pull the pod off with the other to avoid damaging the plant. Harvesting regularly can encourage the plant to produce more pods, extending your harvest season.
- Storing Fresh Peas: After shelling, fresh peas can be stored in the refrigerator for about a week. For longer storage, blanching and freezing peas is an effective method. Blanch peas for 1 to 2 minutes, then quickly cool them in ice water before draining and freezing in airtight containers or bags.
Common Challenges and Solutions
Even with careful planning and maintenance, you may encounter challenges when growing purple hull peas. Here are some common issues and how to address them:
- Poor Germination: If your seeds do not germinate well, the soil may have been too cold or too wet at planting time. Make sure to plant in warm, well-drained soil and consider using inoculated seeds to improve germination.
- Yellowing Leaves: This can be a sign of various issues, including water stress (either too much or too little), nutrient deficiencies, or disease. Evaluate your watering practices and soil conditions, adjusting as necessary.
- Reduced Pod Production: Over-fertilization, particularly with nitrogen, can lead to lush foliage at the expense of pod production. Reduce nitrogen application and ensure plants are getting enough phosphorus and potassium, which support flowering and fruiting.
Maximizing Your Purple Hull Pea Yield
To ensure the highest yield from your purple hull pea plants, consider implementing these additional tips:
- Succession Planting: To extend your harvest season, practice succession planting by sowing seeds at intervals of two to three weeks. This method keeps your garden producing peas over a longer period, rather than all at once.
- Companion Planting: Planting purple hull peas near companion plants can enhance growth, deter pests, and improve flavor. Good companions include corn, which provides a natural trellis for the peas to climb, and cucumbers or squash, which shade the soil, keeping it cool and moist. Avoid planting peas near onions or garlic, as they can inhibit growth.
- Proper Thinning: If seeds were sown too closely, thinning the seedlings to the recommended spacing can prevent overcrowding. This ensures that each plant has enough space, nutrients, and sunlight to develop fully.
- Pest and Disease Vigilance: Regular monitoring for signs of pests and disease can help you take action before problems become severe. Employing natural predators, such as ladybugs for aphid control, and practicing crop rotation can also help maintain a healthy garden.
Enjoying Your Harvest
Once harvested, purple hull peas can be enjoyed in a variety of ways. They’re excellent in soups, stews, salads, or as a simple, nutritious side dish. Fresh peas can be cooked similarly to other fresh beans or peas, with a quick boil in salted water until tender. For a traditional Southern dish, simmer the peas with a piece of ham or bacon for added flavor.
Seed Saving for Future Plantings
If you’re interested in saving seeds for next season, select a few healthy plants and allow their pods to mature fully on the vine until they’re dry and the peas inside are hard. Harvest these pods and store the dried peas in a cool, dry place. Seed saving not only helps preserve heirloom varieties but also ensures that your garden is sustainable and self-reliant.
Conclusion
Planting purple hull peas can be a rewarding endeavor, offering not only a delicious and nutritious addition to your meals but also benefits to your garden ecosystem. By following the guidelines outlined in this article—from choosing the right site and planting seeds correctly to caring for your plants and addressing common challenges—you can ensure a successful and productive pea crop. Whether you’re a novice gardener or a seasoned green thumb, the versatility and resilience of purple hull peas make them a worthy addition to any garden. Enjoy the fruits of your labor and the satisfaction of growing your own food, one pea pod at a time.