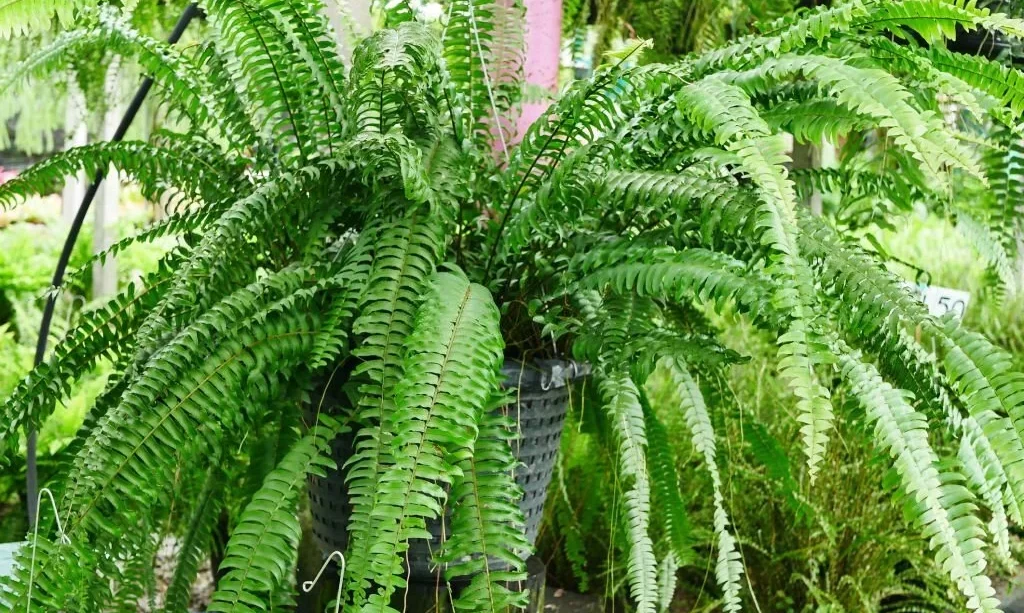
Ferns, with their graceful fronds and vibrant greenery, have a unique charm that can transform any garden into a lush oasis. Whether you’re an avid gardener or just starting out, growing big and beautiful ferns is a delightful journey that offers both relaxation and satisfaction. To help you on this journey, we’ve put together a series of simple yet effective tips that will guide you through the process of nurturing your ferns to impressive sizes. Let’s dive into the first step: choosing the right location for your ferns.

- Ideal for Palms, Ferns, Cycads, Ixora, and Ornamental Plants
- Recommended palm formula by the University of Florida IFAS Extension
- Formulated with complete minor nutrient package for optimum performance
- Contains slow-release nitrogen for extended feeding
- 2lb bag is equipped with a resealable top
Choosing the Right Location
Selecting the perfect spot for your ferns to flourish is like setting the stage for a captivating performance. Ferns thrive in environments that offer a balance between light and shade. While they adore light, direct sunlight can be a bit too intense for their delicate leaves. Instead, opt for areas with filtered sunlight or partial shade. Consider placing your ferns under the gentle canopy of trees, beside larger plants, or on the cooler side of your garden.
By creating an environment that replicates their natural habitat, you’ll be providing your ferns with the optimal conditions for growth. The right location not only ensures they receive the right amount of light but also protects them from the scorching sun, allowing their fronds to unfurl beautifully. So, before you dig that planting hole, take the time to scout your garden for the perfect nook where your ferns can thrive.
Preparing the Soil
Just like a nourishing meal sets the foundation for good health, preparing the soil is essential for your ferns to thrive. Ferns have a fondness for well-draining soil that holds onto moisture without becoming waterlogged. To create the perfect home for your ferns, start by enriching the soil with a touch of organic magic: compost. Mixing in compost not only improves the soil’s structure but also enhances its ability to retain moisture, providing your ferns with a cozy environment to put down their roots.
- 🌺 FERN & PERLITE Potting Mix is a Proffesional Soil Mix for Succulents and Cactuses
- 💕 Capillary Action – Gardenera Tree Fern has a natural wicking action that sucks up water like a sponge and evenly distributes it throughout the orchid potting medium. Allowing every part of the root structure access to the moisture and nutrients necessary for strong and healthy growth.
- 🌳 THE PERFECT SOIL MIX FOR CACTUSES AND SUCCULENTS – Our gritty and aerated soil mix of high quality all natural horticultural grade Fern & Perlite makes for the perfect growth environment for your succulents and cacti.
- 💚 REPLACE LOW QUALITY STORE BOUGHT SOIL – Often times the original soil contained with store bought plants is low quality and nutrient slim. The original soil is often only good for to early growth stages. Our high quality specifically formulated Succulent & Cactus soil mix will allow your plants to flourish, growing large and healthy.
Planting the Ferns
Now that your soil is ready, it’s time to give your ferns a proper welcome into their new home. Begin by digging a hole that’s slightly larger than the root ball of your fern. Gently remove the fern from its container, taking care not to disturb its delicate roots. Place the fern in the hole at the same level it was in the pot, making sure the top of the root ball is level with the soil surface.
As you backfill the hole with soil, use your hands to press the soil down gently. This helps eliminate air pockets that could hinder root growth. Once your fern is securely nestled in the soil, give it a good drink of water to settle the soil around the roots. Remember, ferns appreciate a moist environment, so this initial watering will give them a head start on their growth journey.
Planting ferns is like giving life to a work of art. The careful placement of each fern ensures they have the space they need to spread their fronds and create a living masterpiece in your garden. So, take your time, give each fern its own little stage, and watch as they begin their graceful performance of growth.
Watering Techniques
Just like a good friend who drops by with a refreshing drink on a hot day, proper watering is a key part of your ferns’ well-being. Ferns adore consistent moisture, but they’re not fans of soggy feet. Aim to keep the soil consistently moist, but not overly wet. To achieve this, water your ferns early in the morning. This allows excess moisture to evaporate during the day, reducing the risk of fungal issues.
When watering, aim for the soil around the base of the fern rather than directly on the fronds. This helps prevent water from collecting in the center of the plant, which can lead to crown rot. As you nurture your ferns, you’ll develop a watering rhythm that suits their needs, ensuring they stay hydrated and happy.

- 100% Natural Cedar; Use with your outdoor and indoor plants; will hold moisture in! 4 Quart; Natural product so cedar shavings vary in size.
- Use as an air freshener; natural subtle cedar scent; Refill your cedar sachet bags; Made in USA
- Put in animal bedding; Put in kitty litter; absorbs smelly odors
- Great for hanging planters, essential home accessories; Each bag is hand packed in our facility.
- Generous amount of Organic Cedar Shavings as bag contains close to 5 Quarts for a 4 Quart price!! This is a natural product and individual shavings size may vary, Each bag is hand packed in our warehouse. .
Mulching
Think of mulching as tucking your ferns in under a cozy blanket. Mulch not only adds a touch of aesthetic charm to your garden but also provides practical benefits for your ferns. A layer of organic mulch, such as wood chips or shredded leaves, around the base of your ferns helps retain soil moisture and keeps the temperature steady.
Spread the mulch about two to three inches deep, but be mindful to keep it a few inches away from the fern’s crown. This prevents moisture from accumulating around the base, which could lead to rot. As the mulch gradually breaks down, it enriches the soil with nutrients, creating a nourishing environment for your ferns to flourish.
With proper watering and the gentle embrace of mulch, your ferns will feel right at home in your garden. These simple yet effective techniques ensure they receive the hydration they need while enjoying a protective layer that shields them from extremes. It’s like providing them with their own little oasis where they can thrive and grow to their fullest potential.
Humidity Considerations
Imagine a spa day for your ferns—this is what you’ll be offering them with thoughtful humidity considerations. Ferns are accustomed to higher humidity levels, reminiscent of their natural rainforest habitats. While you might not be able to recreate a rainforest in your garden, you can certainly provide a comfortable level of humidity.
One way to do this is by misting the foliage of your ferns with water regularly. This simple act mimics the gentle mist of rain and creates a more humid microenvironment around the plants. Another option is to place a tray filled with water near your ferns. As the water slowly evaporates, it increases the humidity in the air around your ferns, making them feel right at home.
By paying attention to humidity, you’re giving your ferns an extra dose of care that encourages their lush growth and vibrant fronds.

- Professional Liquid Fertilizer for: Ferns outdoor and as houseplants. Crocodile Fern (Microsorium musifolium), Lemon Button Fern (Nephrolepis cordifolia), Maidenhair Fern (Adiantum raddianum), Rabbit’s-Foot Fern (Humata tyermanii), Staghorn Fern (Platycerium bifurcatum), Bird’s Nest Fern (Asplenium nidus), Kangaroo Paw Fern (Microsorium diversifolium), Boston Fern (Nephrolepis exaltata) etc.
- This food for plants belongs to the latest generation of fertilizers.
- Very rapid effects, can be administered via the roots and as a foliar fertilizer. For 60-125 liters of ready to use liquid fertilizer
- Content: 250 ml, works as an economical concentrate. Simple dosage with the help of the cap.
- The fertilizers from the GREEN24 PROFI LINE were developed by gardeners of various departments and were evolved and produced based on the current knowledge in the field of propagation and cultivation of plants.
Fertilizing Routine
Just like us, ferns appreciate a balanced diet to stay healthy and vibrant. Fertilizing provides the nutrients your ferns need to put on a fantastic growth show. During their active growing season, typically spring and summer, it’s a good idea to feed them with a slow-release, balanced fertilizer.
Follow the instructions on the fertilizer packaging to ensure you’re applying the right amount. Remember, it’s better to under-fertilize than to overdo it, as excess fertilizer can harm your ferns. Applying fertilizer in moderation helps your ferns develop strong fronds and a robust root system, ensuring their growth is steady and impressive.
As you attend to their nutritional needs, your ferns will respond with vibrant colors and lush foliage that’s sure to catch the eye and make your garden a truly inviting space.
Pruning and Maintenance
Just like giving your ferns a stylish haircut, pruning is a vital part of keeping them in tip-top shape. Regularly inspect your ferns for any fronds that have turned yellow or brown. Gently remove these dead or dying fronds at their base to make way for new growth. Pruning not only improves the appearance of your ferns but also prevents potential diseases from spreading.
As you care for your ferns, keep an eye out for any damaged or pest-infested fronds. Promptly removing these can prevent issues from escalating. Regular maintenance also includes checking the soil moisture, adjusting watering as needed, and monitoring the overall health of your ferns. This attentive care ensures your ferns continue to thrive and impress.

- Total length : 245 mm blade length : 96 mm handle length : 122 mm closed handle width : 45 mm
- Stainless steel blade and PVC Handle made. Extra length blade
- Shear sharpness,High quality Stainless steel,Design of comfort and antiskid handle,High elastic spring
- Human body engineering design,Lengthening scissors head FF0C;wide range of application,Safety lock
- Perfect for Fruit trees, gardens, bonsai, medicinal materials Pruning and used as Fruit picking scissors, thin fruit scissors, black wolfberry and prickly ash picking tools
Pest and Disease Control
A vigilant gardener is a fern’s best friend when it comes to pests and diseases. Keep an eye out for common pests like aphids, mealybugs, and scale insects. If you spot any unwelcome visitors, address them promptly using organic pest control methods. These can include introducing beneficial insects, using neem oil, or making a gentle soap spray.
Good air circulation also helps prevent fungal diseases. Avoid overcrowding your ferns, as this can create a humid environment conducive to fungal growth. Regularly inspect your ferns’ foliage and the areas around them to catch and address any issues before they become major problems.
Winter Care
As the seasons change and winter arrives, your ferns might take a break from their active growth. Some fern varieties might even go dormant during this time. As part of your winter care routine, trim back any fronds that have dried up or turned brown. This tidy trim prepares your ferns for a period of rest.
To provide extra protection against the cold, apply a layer of mulch around the base of your ferns. This insulation helps shield their root systems from freezing temperatures. If you’re in an area with extremely cold winters, you might consider bringing potted ferns indoors to a cool, well-lit location.
Conclusion
Your journey to growing big and healthy ferns is a rewarding adventure that brings life and beauty to your garden. By selecting the right location, preparing the soil, mastering watering techniques, and tending to their needs, you’ll witness your ferns flourish with lush fronds and vibrant colors. Remember to maintain humidity levels, feed them with care, and offer protection during winter.
Through attentive care, your ferns will become a testament to your gardening skills and dedication. So, whether you’re gazing at your garden from a cozy corner or sharing it with friends and family, the lush elegance of your ferns will surely be a highlight, showcasing the natural beauty you’ve nurtured.