The pawpaw tree, with its large, lush leaves and delectable fruit, is a hidden gem in the world of fruit gardening. Native to North America, the pawpaw has a rich history and cultural significance, often regarded as a “forgotten fruit”. This guide aims to revive the tradition of growing pawpaw by providing detailed steps on cultivating these trees from seed.
Pawpaw Trees
Pawpaw trees (Asimina triloba) are known for their distinctive, tropical-like foliage and large, greenish-yellow fruit with a custard-like texture. Thriving in temperate climates, pawpaw trees prefer well-drained, fertile soil and can be grown in a range of environmental conditions, from full sun to partial shade. Biodiversity is crucial when planting pawpaws, as cross-pollination between different genetic varieties improves fruit production.
Collecting and Preparing Pawpaw Seeds
To grow pawpaw trees, it starts with the right seeds:
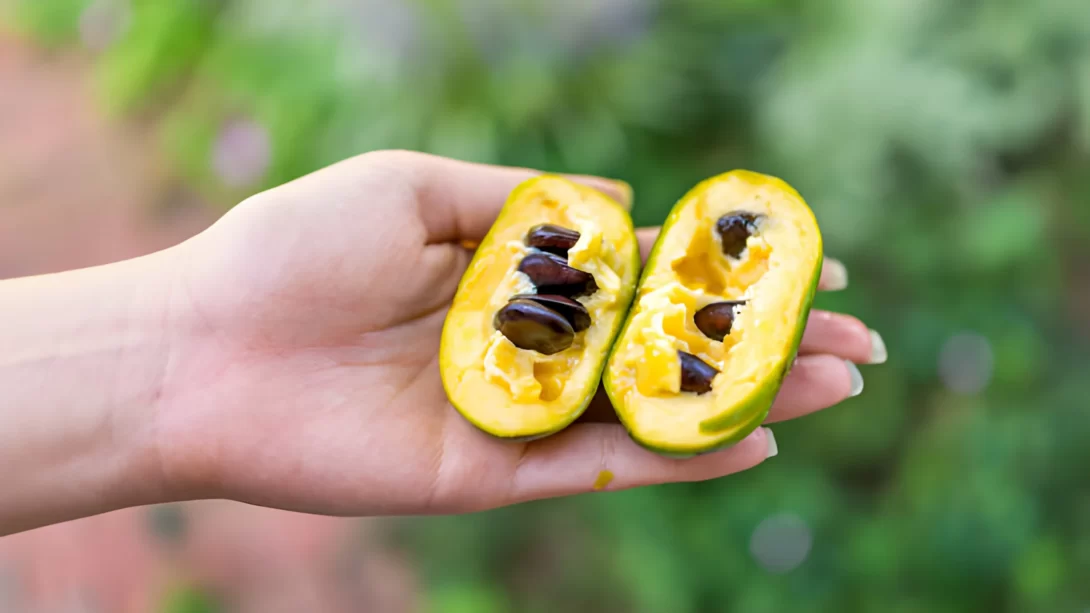
- Seed Collection: The best seeds come from fully ripe pawpaw fruits. Collect seeds from large, healthy fruits with good flavor.
- Cleaning and Storage: Rinse the seeds to remove any fruit pulp, as this can invite mold. Pawpaw seeds should not be allowed to dry out, as this can reduce their viability. Store them in a container with moist peat moss or sand in the refrigerator.
- Stratification Process: Pawpaw seeds require a cold stratification period to break dormancy. This involves storing the seeds at cold temperatures (32-40°F or 0-4°C) for 70 to 100 days.
Planting Pawpaw Seeds
Once the stratification period is complete, the seeds are ready for planting:
- Soil Preparation: Use a well-draining soil mix rich in organic matter. Pawpaws do well in slightly acidic to neutral pH levels.
- Planting Depth and Spacing: Plant the seeds about 1-2 inches deep in the soil. If planting multiple seeds, space them at least a foot apart to give each seedling enough room to grow.
- Germination Conditions: Pawpaw seeds need consistent moisture to germinate. Keep the soil damp but not waterlogged. They can be slow to germinate, sometimes taking several weeks.
Caring for Pawpaw Seedlings
Once your pawpaw seeds have germinated and seedlings begin to emerge, proper care is crucial for their development:
- Watering Requirements: Pawpaw seedlings prefer consistently moist soil. Water them regularly, ensuring the soil stays damp but not waterlogged to prevent root rot.
- Sunlight and Temperature: Initially, pawpaw seedlings benefit from partial shade, especially in hotter climates. As they grow, gradually introduce them to more sunlight. They are adaptable to a range of temperatures but thrive in moderate conditions.
- Feeding Seedlings: Once the seedlings are a few inches tall, you can start feeding them with a balanced, slow-release fertilizer to encourage healthy growth.
Transplanting Pawpaw Seedlings
Transplanting pawpaw seedlings to their final location is a critical step in their growth process:
- Timing: The best time to transplant pawpaw seedlings is in late fall or early spring, avoiding extreme temperatures.
- Selecting a Location: Choose a spot with well-draining soil and access to full sun or partial shade. Consider the mature size of the pawpaw tree, ensuring there is enough space for growth.
- Transplanting Process:
- Carefully remove the seedling from its current pot, being gentle with the root system.
- Dig a hole twice the size of the root ball and as deep as the container they were growing in.
- Place the seedling in the hole, backfill with soil, and water thoroughly to settle the roots.
After transplanting, continue to monitor the seedlings and provide water and nutrients as needed.
Ongoing Care and Maintenance
As pawpaw trees grow, they will require ongoing care to ensure healthy development:
- Pruning: While pawpaws require minimal pruning, removing dead or overcrowded branches can improve air circulation and sunlight exposure.
- Fertilization: Continue to fertilize the trees annually with a balanced fertilizer. Pawpaws have shallow root systems, so avoid over-fertilizing which can damage the roots.
- Pest and Disease Management: Keep an eye out for common pests or diseases. Pawpaw trees are relatively resistant but can occasionally be affected by pests like aphids or diseases such as powdery mildew.
Harvesting and Enjoying Pawpaws
The culmination of your efforts in growing pawpaws from seed is the harvest. Knowing when and how to harvest pawpaws ensures you enjoy the best quality fruit:
- Ripeness Indicators: Pawpaws are ready to harvest when they become slightly soft to the touch and the skin turns from green to a yellowish-brown. The fruit should detach easily from the tree.
- Harvesting Technique: Gently twist the fruit off the branch or use pruning shears to cut the stem close to the fruit. Handle the fruit carefully as they bruise easily.
- Storage: Fresh pawpaws can be stored at room temperature if they are to be eaten soon. For longer storage, keep them in the refrigerator where they can last for up to a week. Pawpaw pulp can also be frozen for extended use.
Conclusion
Growing pawpaws from seed is a journey that requires patience but offers rewarding outcomes. From selecting and preparing seeds to caring for seedlings and enjoying the fruit, each step brings its own set of challenges and delights.
As your pawpaw trees mature, they not only provide delicious fruit but also add unique beauty to your garden with their large, tropical-like leaves. The process of nurturing these trees from seed to fruit deepens your connection with nature and gives a sense of accomplishment.
Pawpaws are more than just fruit; they’re a testament to the joys and rewards of gardening. With the right care and attention, your pawpaw trees will thrive, providing you with a bountiful harvest year after year. So, embrace the adventure of growing pawpaws, and enjoy the lush foliage and unique flavors of this remarkable fruit.