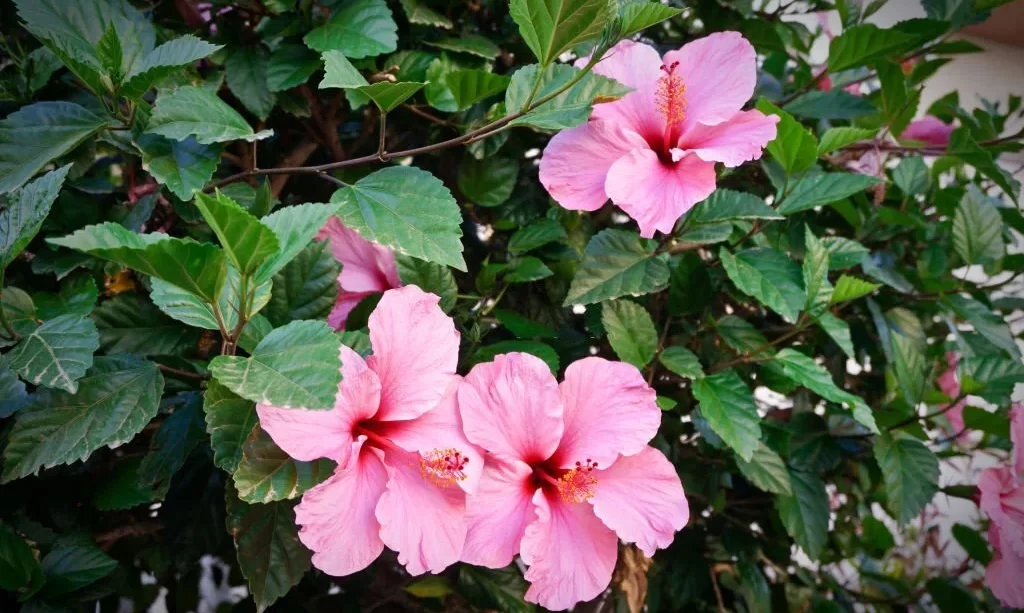
Have you ever marveled at the captivating beauty of hibiscus flowers and wondered if you could grow them yourself? Well, you’re in for a treat! Growing hibiscus from seeds is a delightful journey that allows you to nurture these stunning blooms right in your own garden. In this guide, we’ll start from the very beginning and walk you through each step of the process, making it easy and enjoyable.
Gathering Your Supplies
Before embarking on your hibiscus-growing adventure, it’s important to gather the tools and materials you’ll need. Don’t worry, you won’t need a gardening superstore – just a few simple items that you likely already have or can easily obtain. Here’s what you’ll want to have on hand:
- Hibiscus Seeds: The starting point of your beautiful blossoms. You can find hibiscus seeds at garden centers or online.
- Seed-Starting Trays or Pots: Containers to provide a cozy home for your hibiscus seeds as they germinate and grow.
- Seed-Starting Mix: A special soil mixture designed to give your seeds the best possible start in life.
- Spray Bottle: An invaluable tool for providing a gentle mist of water – perfect for not disturbing those tiny seeds.
- Access to Sunlight: Find a sunny spot where your hibiscus seeds can soak up some rays without being scorched.
With these supplies in hand, you’re ready to embark on your hibiscus-growing journey and watch those tiny seeds transform into vibrant, colorful blooms that will brighten up your garden and your days. Let’s dive in!
Preparing the Seeds
Now that you have your supplies ready, it’s time to give your hibiscus seeds the best possible start. Preparing the seeds is like giving them a cozy blanket and a warm hug before they start their growth journey. Here’s what you need to do:
- Soaking Seeds: Some gardeners like to give their hibiscus seeds a gentle soak before planting. This can help soften the outer seed coat and encourage germination. You can place the seeds in a shallow dish of water for a few hours or overnight.
- Scarification (Optional): If your hibiscus seeds have a hard outer shell, you can gently nick or file a small portion of the seed coat. This can help water penetrate the seed and promote sprouting.
- Damp Paper Towel Method: For a little extra assurance, you can place your soaked seeds between damp paper towels and put them in a plastic bag. Keep the bag in a warm place, and check daily for signs of sprouting.

- Plant Nursery pot with humidity dome can keep the moisture and temperature. This humidity will improve germination rate and survival rate. Dome height: 3.5” Inch.
- Container dimensions : 3.7″ opening diameter at top, bottom diameter 2.5″, Height 3.2”. ( dimensions shown in the product images).
- The Nursery Pot has 8 small Drain holes at the bottom to keep soil drained and ventilated, to prevent from root rot. Top raised rim make they are easy to handle and to stack.
- Light weight, soft, washable and reusable. The built-in humidity cover can be used for the seed germination period, so you don’t need to transplant before moving into the garden.
- Plastic Nursery Pots for Plants,Cuttings & Seedlings, Seeds Starting. Great for Doing lot of succulent propagation, Great as plant transition pots.
Planting the Seeds
Now comes the exciting part – planting your hibiscus seeds and watching them come to life! It’s like tucking them into bed and waiting for them to wake up with enthusiasm. Follow these steps for successful planting:
- Fill Containers: Whether you’re using seed-starting trays or small pots, fill them with the seed-starting mix. Moisten the mix slightly so it’s damp but not soggy.
- Planting Depth: Gently press your hibiscus seeds into the soil. They don’t need to be buried too deep; just a light covering of soil will do. Remember, these little seeds are like precious gems – handle them with care!
- Label Your Seeds: It’s easy to forget what you planted, especially if you’re trying different varieties. Write the names or types of hibiscus on a label and stick it in the container. This way, you won’t be left guessing when your seeds start sprouting.
- Mist and Cover: Use your spray bottle to give the planted seeds a fine mist of water. Then, cover the containers with plastic wrap or a clear plastic lid to create a mini greenhouse. This helps create a humid environment that encourages germination.
With your hibiscus seeds tucked in and ready to grow, you’ll soon be on your way to witnessing the magic of tiny sprouts emerging from the soil. Get ready to celebrate each little victory as your hibiscus adventure continues!
Providing the Right Environment
Just like setting the stage for a perfect play, creating the right environment for your hibiscus seedlings is crucial. Think of it as giving them a comfortable home where they can stretch their tiny green arms and bask in the sunlight. Follow these steps to ensure they have everything they need:
- Warmth and Sunlight: Place your seed containers in a warm and bright location, like a sunny windowsill. Hibiscus seeds love warmth and light, which kickstarts their growth.
- Consistent Moisture: While you want the soil to stay damp, be careful not to overwater. A spray bottle can help you keep the soil evenly moist without drowning the seeds.
- Remove Cover Gradually: As your seedlings begin to sprout, it’s time to gradually remove the plastic cover. This helps them adjust to the surrounding humidity and prepares them for life without the “greenhouse”.

- ALL-IN-ONE POTTING SOIL SOLUTION: FoxFarm ocean forest potting soil is a blend designed to give your plants everything they need to thrive. Ideal for container plants, this planting soil provides optimal nutrient and soil aeration
- MOISTURE-LOCKING NUTRIENT BLEND: This organic potting soil for plant is packed with aged forest products, sphagnum peat moss, earthworm castings, bat guano, and fish emulsion, each ingredient enhances moisture retention and nutrient uptake
- TOP-NOTCH SOIL FOR EVERY PLANT: From roses and shrubs to seedlings and trees, this garden soil supports vigorous growth and branching. This outdoor & indoor plant soil’s pH-adjusted blend promotes healthy, lush foliage for all plant varieties
- YOUR GO-TO SOIL FOR ALL MEDIUMS: Our potting soil mix is perfect for container gardens, houseplants, and outdoor setups. Ocean plant versatile blend provides a balanced environment for robust growth, ensuring your plants thrive in any setting
- CONVENIENT SOIL READY TO USE: This houseplant potting soil is ready to use out of the bag, no additional ingredients are needed. Use for planting or top-dressing, with the optional pairing of FoxFarm liquid fertilizers for enhanced growth all season
Caring for Seedlings
Your hibiscus seedlings are like delicate little babies, and they’ll need your tender care as they grow. Think of yourself as their nurturing guardian, guiding them through their early stages of life:
- Thinning Seedlings: If multiple seedlings sprout in one container, you might need to thin them out. Choose the healthiest-looking ones and gently snip off the others at soil level. This gives the remaining seedlings more space and resources to thrive.
- Fertilizing Seedlings: As your hibiscus seedlings grow their first set of true leaves, you can start feeding them with a diluted, balanced liquid fertilizer. This helps provide the nutrients they need for healthy development.
- Transplanting: Once your hibiscus seedlings have a few sets of leaves and are big enough to handle, it’s time to transplant them into slightly larger pots. This gives their growing roots more space to spread out.
- Hardening Off: Before you move your hibiscus seedlings outside permanently, they need to toughen up a bit. This process, known as hardening off, involves gradually exposing them to outdoor conditions over a week or two. Start with a few hours of outdoor time in a sheltered spot and gradually increase their exposure to sunlight and wind.
With your attentive care, your hibiscus seedlings will transform from delicate sprouts to sturdy plants ready to face the world. You’ll be rewarded with the joy of watching them grow and blossom into beautiful hibiscus flowers, adding a touch of vibrant color to your garden or indoor space.
Transplanting to the Garden
The time has come to take your hibiscus seedlings on a grand adventure – transplanting them into the great outdoors! Think of it as moving them from a cozy nursery to their forever home in your garden. Follow these steps to ensure a smooth transition:
- Choosing the Right Spot: Find a sunny and well-draining spot in your garden for your hibiscus. They love soaking up the sun, but also appreciate some shade during the hottest parts of the day.
- Preparing the Soil: Dig a hole that’s slightly larger than the root ball of your seedling. Mix in some compost or well-rotted manure to enrich the soil and give your hibiscus a good start.
- Gently Does It: Carefully remove your hibiscus seedling from its pot, being mindful not to damage the delicate roots. Place it in the hole and fill in the soil around it, pressing gently to secure the plant in place.
- Watering In: After transplanting, give your hibiscus a good drink of water to help settle the soil and eliminate air pockets around the roots.

- Sold on Amazon
- Scientifically Formulated for Optimum Plant Growth
- Great for All Hibiscus Varieties
- Contains Fritted Trace Elements
Regular Maintenance
Now that your hibiscus seedlings are in their new home, it’s time to shower them with love and care. Think of yourself as a nurturing gardener, tending to their needs as they flourish:
- Watering: Keep a close eye on the moisture level of the soil. While hibiscus plants like regular watering, they also don’t like to sit in soggy soil. Water when the top inch of soil feels dry to the touch.
- Mulching: Applying a layer of organic mulch around the base of your hibiscus helps retain moisture, keeps the soil cool, and prevents weed growth. It’s like tucking them in with a cozy blanket.
- Fertilizing: Hibiscus plants appreciate a balanced fertilizer every 4-6 weeks during the growing season. Look for a fertilizer with equal amounts of nitrogen, phosphorus, and potassium.
- Pruning: To encourage bushy growth and abundant flowering, pinch off the tips of young shoots. This helps your hibiscus develop a fuller shape and produce more vibrant blooms.
- Pest and Disease Management: Keep an eye out for pests like aphids or fungal diseases. If you spot any issues, address them promptly with appropriate treatments to ensure your hibiscus stays healthy.
With your watchful eye and nurturing touch, your hibiscus plants will thrive and reward you with their stunning blossoms. As you care for them through the seasons, you’ll witness the magic of nature as your hibiscus grows and brings beauty to your garden or landscape.
Protecting from Frost
Just as you would bundle up in a cozy coat during chilly weather, your hibiscus needs some protection from frosty temperatures. Frost can be a bit too harsh for these tropical beauties, so follow these steps to keep them snug and safe:
- Covering Up: As temperatures start to drop, drape a breathable cloth or frost cloth over your hibiscus plants in the evening. This extra layer acts like a warm blanket, shielding them from the cold.
- Mulching Again: Applying a thicker layer of mulch around the base of your hibiscus can provide additional insulation and help retain soil warmth during frosty nights.
- Potted Hibiscus: If you have potted hibiscus, consider moving them to a sheltered spot like a garage or a covered porch when frost is in the forecast. Just make sure they still get some light!
- Keep an Eye Out: Monitor weather reports and be prepared to take action if frost is predicted. Acting promptly can make a significant difference in protecting your hibiscus from potential damage.

- 1.Drawstring Design: the plant frost covers are sturdy and large enough to fit the plants easily, and there is a drawstring for tightening which makes it secure against the wind with easy to cinch the bottoms usage.
- Great winter Cover: This plant cover are made of breathable, lightweight fabrics material that allow plants to absorb sunlight and water, and are protected from extreme cold frost ,heavy rain and snow, and protect plants from birds, insects, deer, rabbits and other pests .
- Package include: the package include 3 set of plant frost protection bags ,the size is: 47″ X 31.5″ ,easy to use and you don’t need to remove each morning and replace each evening.
- Wide uses: Warm frost blanket is ideal for saplings, rose bushes, baby trees,hanging flower basket ,tomatoes and fruit bearing bushes from the harsh elements. Worked wonderfully to protect from frost.
- GUARANTEE: If you are not satisfied for any reason, just return for a refund of your purchase price; we promise 24 hours customer support, please feel free to contact us for any product&order problem.
Conclusion
Growing hibiscus from seeds is a rewarding journey that lets you witness the miracle of life right in your garden. From the excitement of planting the seeds to the joy of seeing those vibrant blooms, each step brings you closer to nature’s wonders. By providing the right care, attention, and a touch of your green thumb, you’ll create a thriving hibiscus paradise that enchants you with its beauty year after year. So, embrace your role as a hibiscus caretaker, and let the stunning colors and graceful petals of these tropical treasures brighten your outdoor space and your heart.