Turnips, with their earthy flavor and crisp texture, are a delightful addition to countless culinary creations. Whether you’re preparing a hearty stew, a crisp salad, or a savory side dish, knowing how to cut a turnip with precision is a valuable kitchen skill. By mastering the art of turnip cutting, you’ll not only enhance your culinary prowess but also elevate the visual appeal and taste of your dishes. In this guide, we’ll take you through the step-by-step process of cutting a turnip like a pro. From selecting the perfect turnip to choosing the right tools, we’ll equip you with the knowledge and techniques needed to make turnip cutting a breeze.

- QUALITY CONSTRUCTION: Knife is precision-forged with high-carbon German steel for better durability, and taper-ground edge allows for increased efficiency when cutting along with incredible long-lasting sharpness
- SUPERIOR DESIGN: The finest handle in forged cutlery; built to last ergonomic handle offers comfort and a non-slip grip, even with wet hands
- BEST USE: The perfect knife for chopping, mincing, and cutting. Ideal for dicing onions, mincing shallots, chopping herbs, crushing garlic, and shredding cabbage
- EASY CARE: To maximize the performance and longevity of your knife, carefully wash cutlery by hand with warm water and mild soap; rinse and dry completely with a soft towel. Do not place in dishwasher or submerge for long periods of time
- MERCER CULINARY GENESIS SERIES: Never stop experimenting in the kitchen; this Genesis knife is essential in every kitchen, perfect for professional use or the home cooking enthusiast
Gathering Your Tools
Before you embark on your turnip-cutting adventure, it’s essential to gather the necessary tools. Here’s a brief overview of what you’ll need:
- Sharp Knife: A high-quality, sharp knife is your primary tool for cutting turnips. A chef’s knife or a utility knife works well for most cutting tasks.
- Cutting Board: Use a sturdy cutting board with a non-slip surface to provide a stable and safe workspace.
- Vegetable Peeler (Optional): While not mandatory, a vegetable peeler can be useful for removing the turnip’s skin if desired.
- Bowl or Container: Have a bowl or container on hand for collecting your cut turnip pieces.
- Clean Towel or Paper Towels: Keep a clean towel or paper towels nearby for wiping your hands or cleaning up any mess as you work.
By ensuring you have these tools at your disposal, you’ll set the stage for a smooth and efficient turnip-cutting experience. Now, let’s dive into the exciting world of turnip preparation!
Preparing the Turnip
Before you start cutting your turnip, it’s essential to prepare it properly. This ensures that you’re working with a clean and fresh vegetable. Follow these steps to get your turnip ready for cutting:
- Selecting a Fresh Turnip: Begin by choosing a turnip that is firm to the touch, with smooth skin and vibrant color. Avoid turnips that are overly soft, have wrinkles, or show signs of blemishes.
- Washing the Turnip: Rinse the turnip under cold running water to remove any dirt or debris. Use a vegetable brush or your fingers to scrub the skin gently, paying special attention to the root end and any stubborn spots.
- Optional Peeling: While turnip skin is edible and contains nutrients, some recipes may call for peeled turnips for a smoother texture. If you prefer to peel the turnip, use a vegetable peeler to remove the skin in long, downward strokes. Alternatively, you can leave the skin on for added flavor and nutrition.
- Trimming: Trim off the top and bottom of the turnip with your knife. This step removes any remaining stem or root remnants and creates a flat, stable base for cutting.
With your turnip cleaned, peeled (if desired), and trimmed, you’re now ready to explore various cutting techniques to suit your culinary needs.

Cutting Techniques
Mastering different cutting techniques allows you to adapt the turnip to various recipes. Here are some common cutting styles:
- Slicing: To create turnip slices, position the turnip horizontally on the cutting board. Use a knife to make crosswise cuts, creating round or half-moon-shaped pieces. Adjust the thickness of the slices according to your recipe’s requirements.
- Dicing: For diced turnips, start by cutting the turnip into slices as mentioned above. Then, stack the slices and cut them into strips. Finally, cut across the strips to achieve small, uniform cubes.
- Julienning: Julienning involves creating thin, matchstick-like strips of turnip. Begin by cutting the turnip into rectangular planks. Then, stack the planks and slice them into thin strips, producing julienne pieces.
- Rounds or Wedges: To make round turnip pieces or wedges, cut the peeled turnip into rounds by slicing perpendicular to its length. For wedges, further cut the rounds into halves or quarters.
- Decorative Shapes (Optional): Get creative by using cookie cutters or specialized vegetable cutters to create decorative shapes from turnip slices. These shapes can add a visually appealing touch to your dishes.
The choice of cutting technique depends on the recipe you’re preparing and your desired presentation. Whether you’re aiming for a classic sliced turnip salad or elegantly julienned turnip for a stir-fry, mastering these techniques opens up a world of culinary possibilities.
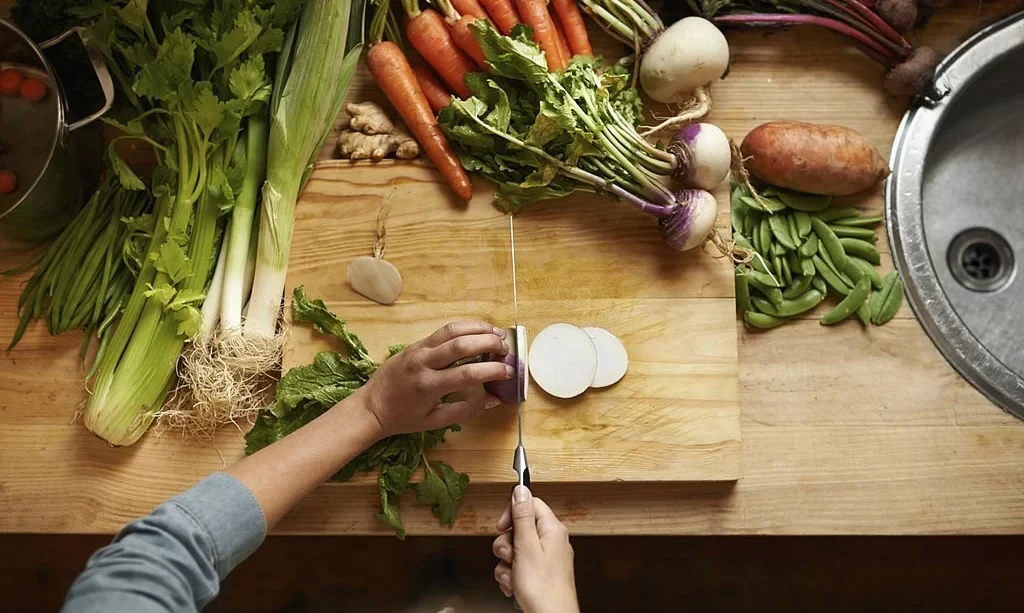
How to Slice a Turnip
Slicing a turnip is one of the simplest cutting techniques and is perfect for various dishes, from salads to stir-fries. Follow these steps for perfectly sliced turnip:
- Position the Turnip: Place the peeled and trimmed turnip horizontally on your cutting board, ensuring it’s stable and won’t roll.
- Choose Your Thickness: Decide how thick you want your turnip slices to be. Thinner slices are great for salads, while slightly thicker ones work well in stir-fries. Adjust your knife accordingly.
- Make Crosswise Cuts: Using a steady hand and a sharp knife, make crosswise cuts through the turnip, moving from one end to the other. Maintain a consistent thickness for even slices.
- Continue Slicing: As you make each cut, move your fingers back to avoid getting too close to the knife blade. This helps prevent accidental cuts.
- Collect the Slices: Gather the sliced turnip pieces and transfer them to your bowl or container for use in your chosen recipe.
How to Dice a Turnip
Dicing turnips is a versatile cutting technique that’s ideal for soups, stews, and roasted dishes. Here’s how to dice a turnip like a pro:
- Start with Slices: Begin by slicing your peeled and trimmed turnip into rounds, following the steps in the “How to Slice a Turnip” section.
- Stack the Slices: Take the turnip rounds and stack them neatly on top of each other. Align them as closely as possible to ensure uniform dice.
- Create Strips: With your stacked turnip rounds, use your knife to cut them into thin strips. The thickness of these strips will determine the size of your dice.
- Crosswise Cuts: Turn the strips sideways and cut across them to create small, uniform cubes. Maintain a steady hand and consistent thickness for even dicing.
- Collect the Diced Turnip: Gather the diced turnip cubes and transfer them to your bowl or container, ready to add a burst of flavor and texture to your culinary creations.
How to Julien a Turnip
Julienning turnips results in thin, elegant strips that are perfect for salads and garnishes. Follow these steps to julienne a turnip with finesse:
- Prep the Turnip: Begin with a peeled and trimmed turnip. You may choose to cut the turnip into rectangular planks as a starting point.
- Stack the Planks: Stack the rectangular turnip planks on top of each other, aligning them as closely as possible.
- Create Thin Strips: Using a sharp knife, slice the stacked turnip planks into thin strips. Aim for a consistent thickness to achieve uniform julienne pieces.
- Finalize the Juliennes: Once you have cut the turnip into strips, you’ll have delicate julienne pieces. Gather these strips, and they’re ready to grace your dishes with their slender, decorative appearance.
These cutting techniques allow you to harness the full potential of turnips in your cooking endeavors, ensuring both visual appeal and delightful flavors in your culinary creations.
Creative Cutting Styles (Optional)
While the basic slicing, dicing, and julienning techniques cover most culinary needs, you can also explore creative cutting styles to add flair to your dishes. Here are a couple of optional styles to consider:
- Turning Turnips: Turning is a decorative cutting technique that transforms turnips into elegant shapes. Using a specialized tool called a vegetable turner or tourne knife, you can create small, barrel-like turnip pieces with intricate patterns. This technique is often used in fine dining presentations.
- Spiralizing: If you’re looking for a unique twist, consider spiralizing your turnips into long, spiral-shaped noodles. A spiralizer tool allows you to achieve this fun and visually appealing cut, perfect for salads or as a low-carb pasta alternative.
Storing Cut Turnips
Properly storing cut turnips helps maintain their freshness and flavor until you’re ready to use them. Here’s how to store cut turnips:
- Refrigeration: Place your cut turnip pieces in an airtight container or a resealable plastic bag. Store them in the refrigerator’s crisper drawer. This method can keep cut turnips fresh for several days.
- Moisture Control: To prevent moisture loss and maintain crispness, you can place a slightly damp paper towel in the container with the turnip pieces. This helps retain their texture.
- Frequent Use: If you plan to use the cut turnips within a day or two, simply cover them with plastic wrap or aluminum foil and keep them in the fridge.
- Labeling: For easy identification, consider labeling the container with the date of preparation. This ensures you use the cut turnips while they are at their best.
Remember that while cut turnips can be stored, they are freshest when used shortly after cutting.

- EXTRA LARGE CAPACITY: KITHELP 28 pieces food storage containers capacity is much larger than its competitors.Include 14 containers with 14 lids.11 sizes fulfill all your needs. (2) 6 rectangular containers (2x54oz , 2x34oz , 2x17oz); (3) 4 square containers(71oz ,44oz,27oz,14oz); (2) 4 round containers(54oz , 37oz , 22oz , 11.8oz)
- BPA FREE & FOOD GRADE MATERIALS: Our BPA free freezer containers for food are made of food-grade PP and silicone materials, PVC-free, lead-free, chloride-free & BPA free, safe and healthy
- FREEZER, MICROWAVE & DISHWASHER SAFE: Easy snap lock containers for food are freezer safe and dishwasher safe. This airtight storage containers are microwave safe.[Tips]Please do not put the lid in the dishwasher & microwave.Temperature resistant -20℃ to 120℃
- AIRTIGHT & LEAKPROF: With 4 sides locking lids and silicone sealing, our kitchen containers storage set are super airtight and leak-proof. Each box has a corresponding size lid. Make sure the lid is aligned with the edges of the box when closing the lid
- STACKABLE DESIGN & PORTABLE: With the stackable design, our plastic storage containers can maximize the use of your kitchen and pantry. Your kitchen and pantry will be more organized and clean. It is portable that you can take it with you to office or outdoors or anywhere you like
Conclusion: Mastering Turnip Cutting
Congratulations! You’ve now learned the essential techniques for cutting turnips like a seasoned chef. From selecting the perfect turnip to mastering various cutting styles, you’re equipped to create turnip dishes that are not only delicious but also visually stunning.
By practicing these cutting methods and exploring creative styles, you can elevate your culinary creations, impress your guests, and infuse your dishes with the unique flavor and texture of turnips. Whether you’re preparing a hearty stew, a vibrant salad, or a gourmet masterpiece, your newfound turnip-cutting skills will undoubtedly be a valuable asset in your kitchen repertoire.
So, don’t hesitate to experiment with turnips in your cooking endeavors. Embrace the art of turnip cutting, and let your culinary creativity flourish!